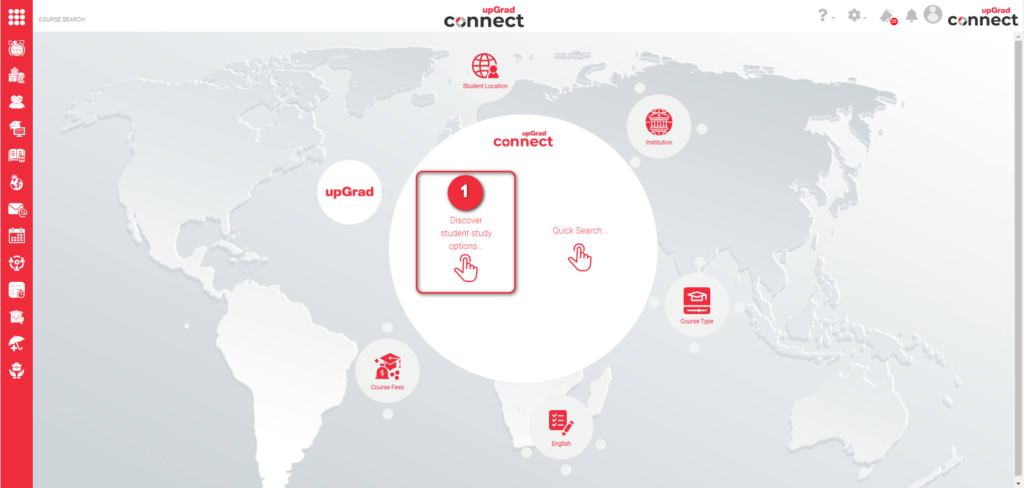
Do a quick course search according to the student’s aspiration or specific course
Do a search using various filters to help students see options available
Overview
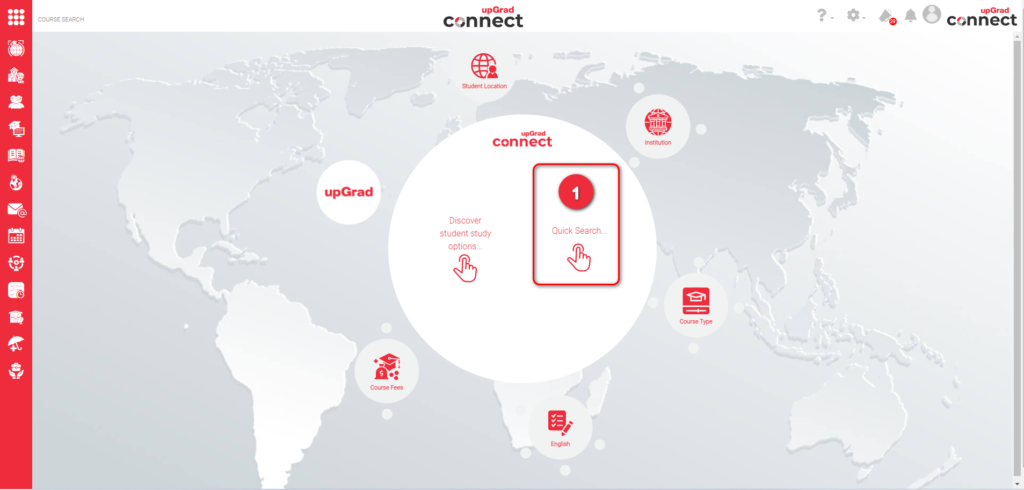
There are two Course Search types you can use depending on the situation that the student has:
Discover Student Study Option. Designed to help you navigate step by step through your students’ requirements naturally and easily narrowing down towards the most suitable course options for them.
Quick Search. Designed for your convenience with students that have specific courses they wish to study. Simply type in the name of the course, country or city location, institution, field of study to arrive at your course selection.
upGrad has partnership with Institutions in various countries with global contracts. This means upGrad should be able to source students from any country in the world. However, Institutions may allow or deny certain geographic locations, countries or territories.
These territory limitations is managed in upGrad Connect App. So, when you search for courses, it will only display institutions where you can recruit based on your source market.
Quick Search takes the user accounts country as the source territory and you cannot change this.
Discover Student Study Option allows you to change the source country or any territory you wish.
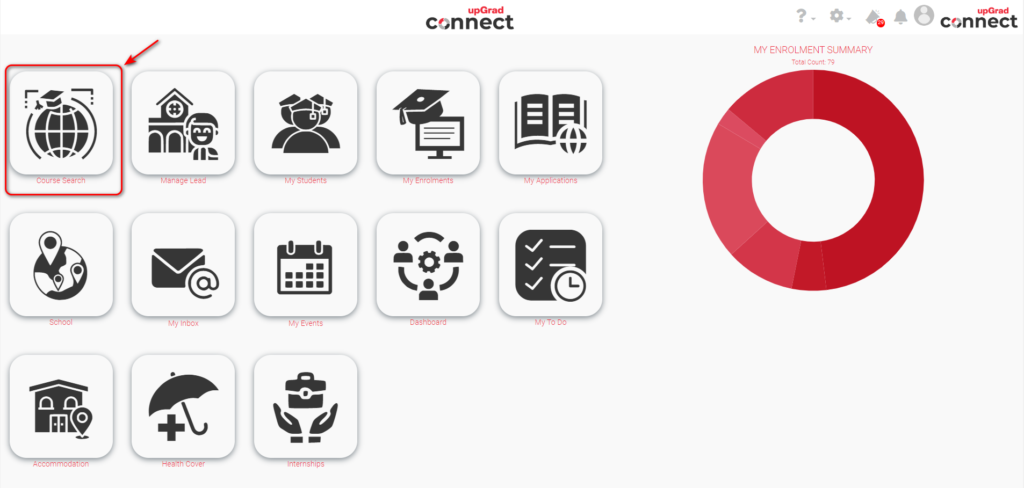
To start exploring the courses offered, click the Course Search icon in the main menu
Quick Search is very useful if the student is very certain in what he/she would like to study. Click Quick Search to start.
What? You can type here any of the following:
What the student would like to study, complete course name like Bachelor of Applied Finance, Bachelor of Information Technology, etc.
Study area like finance, marketing, or information technology
What the student would like to become or career aspiration of the student like financial planner, digital marketing, data analyst, etc.
Where? This is the destination that the student would like to study. You can type here any of the following:
Country like Australia, United Kingdom, etc.
State like Victoria, Texas, etc.
City like Sydney, London, etc.
Institution where the course is offered like Troy University, Charles Darwin University, etc.
2
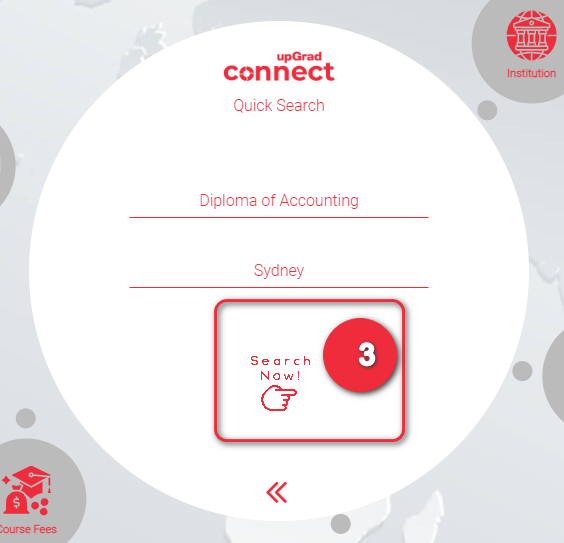
Example You want to see ‘Diploma of Accounting’ courses in ‘Sydney’
2.2 Notice that because you are in Quick Search mode, all the search filter bubbles around this big bubble are disabled and you cannot use them. Click ‘Back’ if you prefer to use the search filters instead of Quick Search.
3
If you are fine with your inputs, click ‘Search Now‘ to see the number of results.
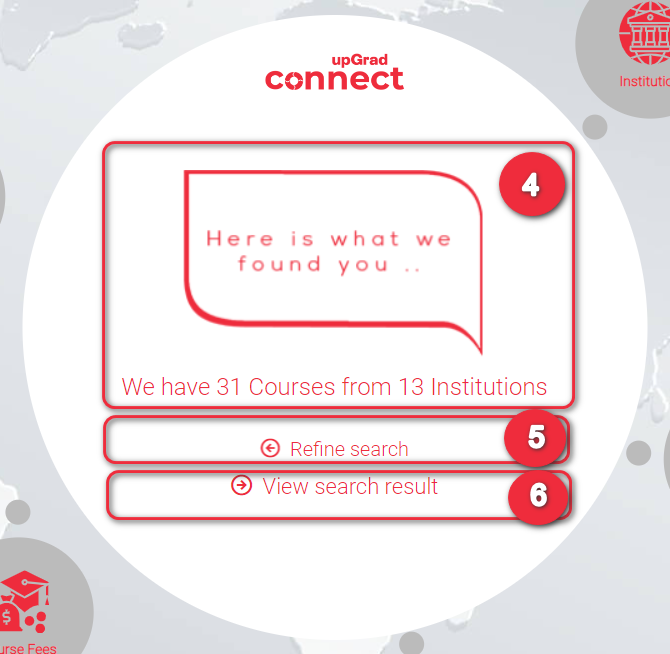
Quick Search Result. The result shows how many courses match your inputs and the number of institutions they are offered at. In this case, 17 courses match your inputs and these are offered at 9 institutions.
4
5
Click Refine search to change your search criteria. This happens sometimes when there are no courses found that match your criteria or when you are expecting a smaller/ bigger number of results.
Click View search result if you are satisfied with the range so you can see the details of courses that match your search criteria. Sometimes this is disabled (you cannot use this) when the search gives a very large result. With very large number of results, it will be very hard for the student and for you to search courses. In this case, you need to refine your criteria (What and Where) to narrow down the results.
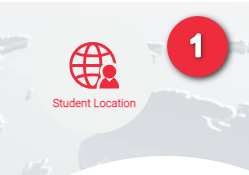
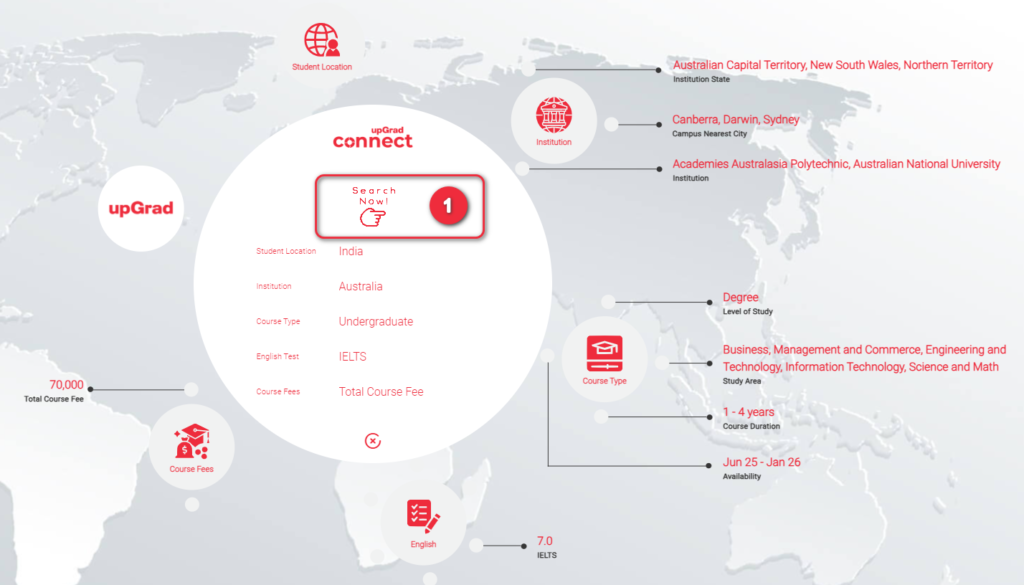
Student Location is the current location of the student when submitting an application. It can also be defined as which country the student is applying for his/ her Visa from.
Quick Tip. Click anywhere outside a bubble to see the previous filters.
1
2
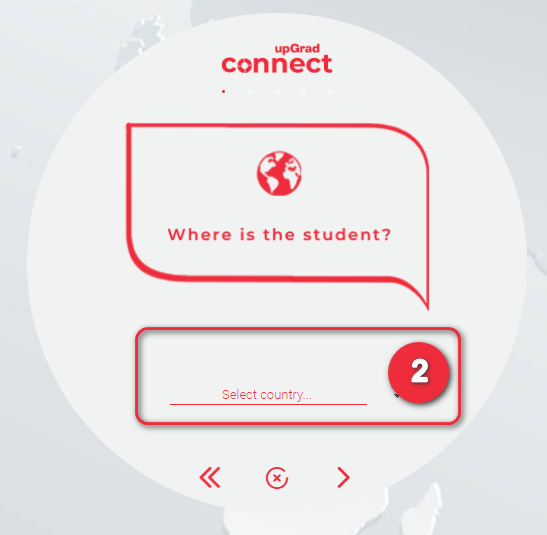
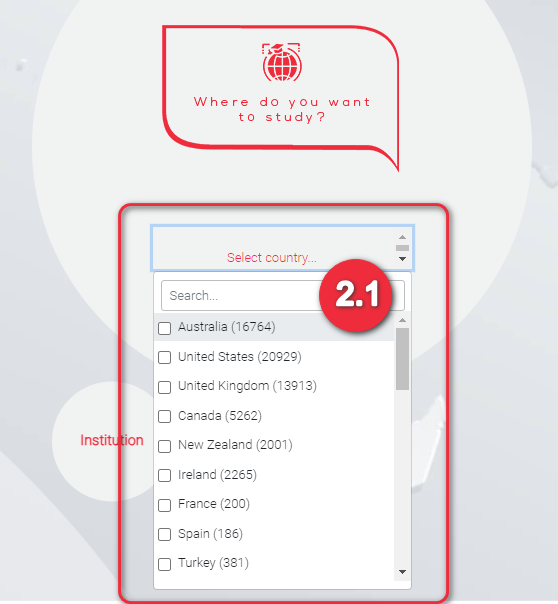
Click Select Country to display the list of countries you can select from
Click the country name to select it. In case Student is not yet sure where he/ she will get Visa from, you can select multiple countries.
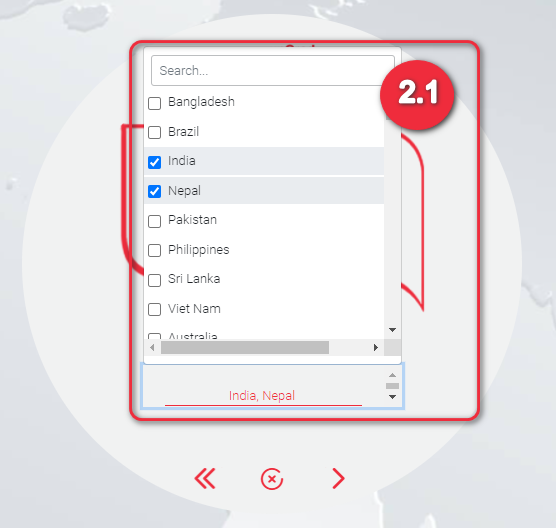
2.1 As you click multiple countries, you will see these are added in the field. We selected India and Nepal that’s why you see India, Nepal at the top.
2.2 In case you have selected a lot of countries that cannot fit in the line anymore, use the scrollbar to view the selected countries
At the bottom of the bubble are some quick action buttons to do the following:
3
Go back to full view or go back to start.
Remove all selected countries
Go to the next filter category, Institution.
4
Click this to go directly to the next filter category, Institution.
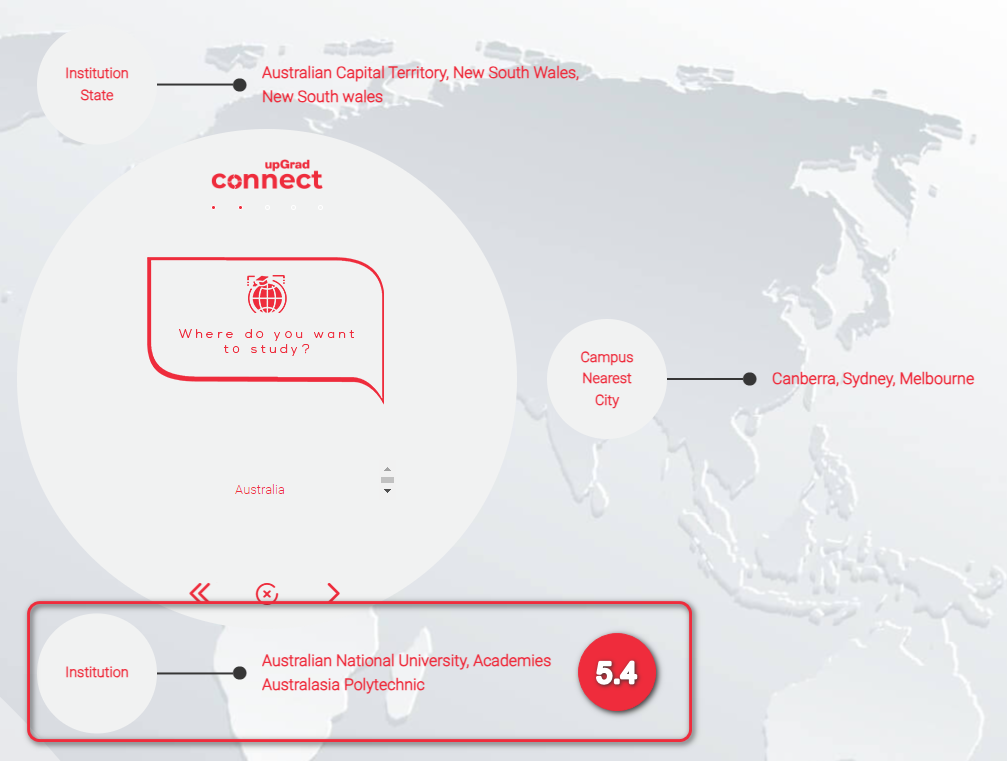
Institution Filter is where the student wants to study. You can narrow the search result by using the following filters:
By Institution Country
By Institution State where Campus is located
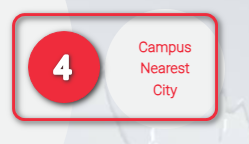
By Campus Nearest City – the metropolitan city nearest to the campus
By Institution Name – when searching for courses at a specific institution
1
2
This is how it looks like when the Institution Filter is zoomed in.
2.1 Click ‘Select country’ to display the list of countries with available institutions.
Click the country name to select it. You can select multiple countries in cases where the student is not yet sure where he/ she wishes to study. You can also type the country name instead of using the scroll bar.
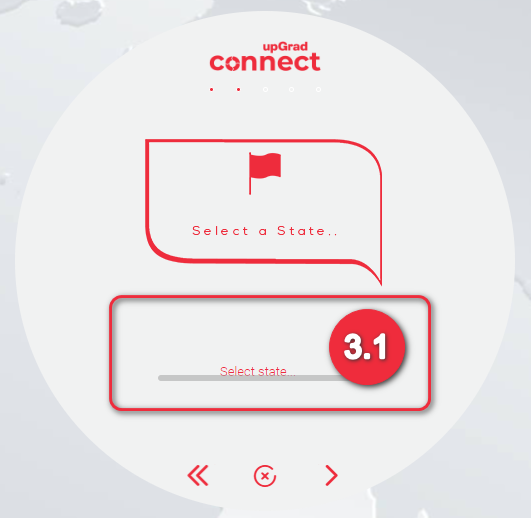
Click Institution State if you want to use this filter.
3
3.1 Click ‘Select state’ for a list of states to choose from. The states listed will only be the states for the country/ countries you previously selected.
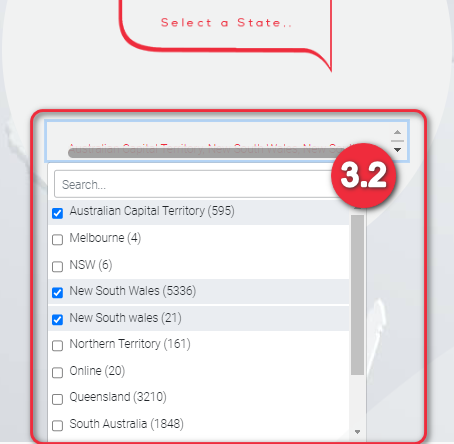
3.2 Click the state name to select it. You can click more than one state where the Student has multiple preferences.
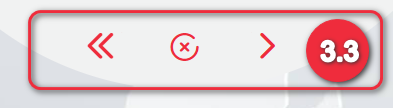
At the bottom of the bubble are some quick action buttons to do the following:
Go back to Main Search bubble to Search Now or Reset
Remove all selected values
Go to institution / country search.
Click this to go directly to the next filter category, Institution.
3.4 Text display of the Institution State/s you have selected
4
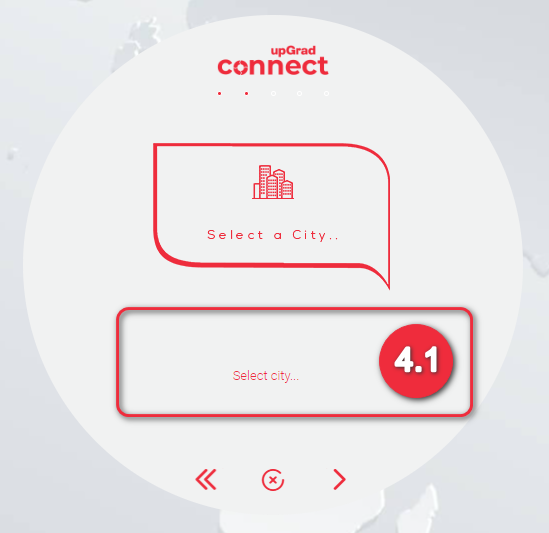
Click Campus Nearest City if you want to use this filter.
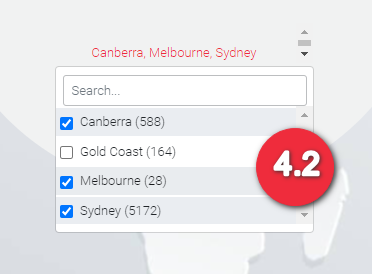
4.1 Click Select city to display the list of cities that you can choose from. The cities listed will only be the cities coming from the state/s you previously selected.
4.2 Click the city name to select it. In case Student has multiple preferences, you can click more than 1 city.
4.3 At the bottom of the bubble are some quick action buttons to do the following:
Go back to Main Search bubble to Search Now or Reset
Remove all selected values
Go to institution / country search.
Click this to select another filter you would like to use. This also allows you to view your previous selections. You will not lose your selections when you click this.
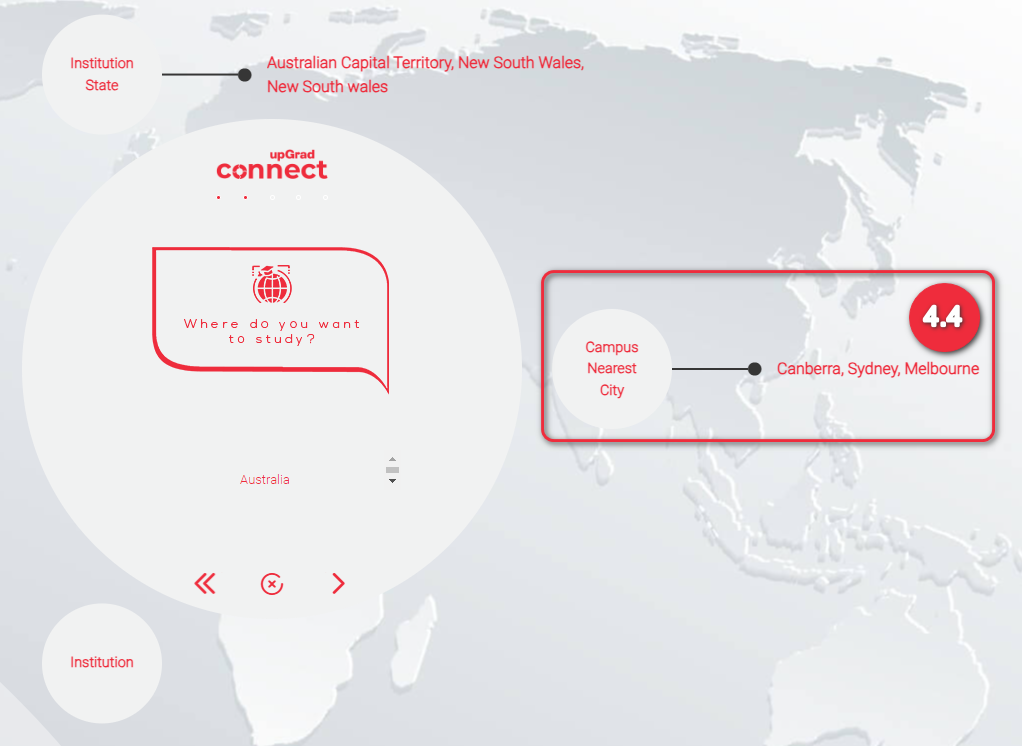
4.4 Text display of the Campus Nearest City you have selected.
Click Institution if you want to use this filter.
5
5.1 Click Select institution to display the list of institutions that you can choose from. The institutions listed will only be those located in the city/ cities you previously selected.
5.2 Click the institution name to select it. You can click more than one institution where the Student has multiple preferences
5.3 Click Select institution to display the list of institutions that you can choose from. The institutions listed will only be those located in the city/ cities you previously selected.
Go back to Main Search bubble to Search Now or Reset
Remove all selected values
Go to institution / country search.
Click this to select another filter you would like to use. This also allows you to view your previous selections. You will not lose your selections when you click this.
5.4 Text display of the Institution you have selected
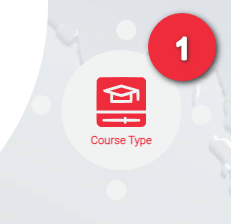
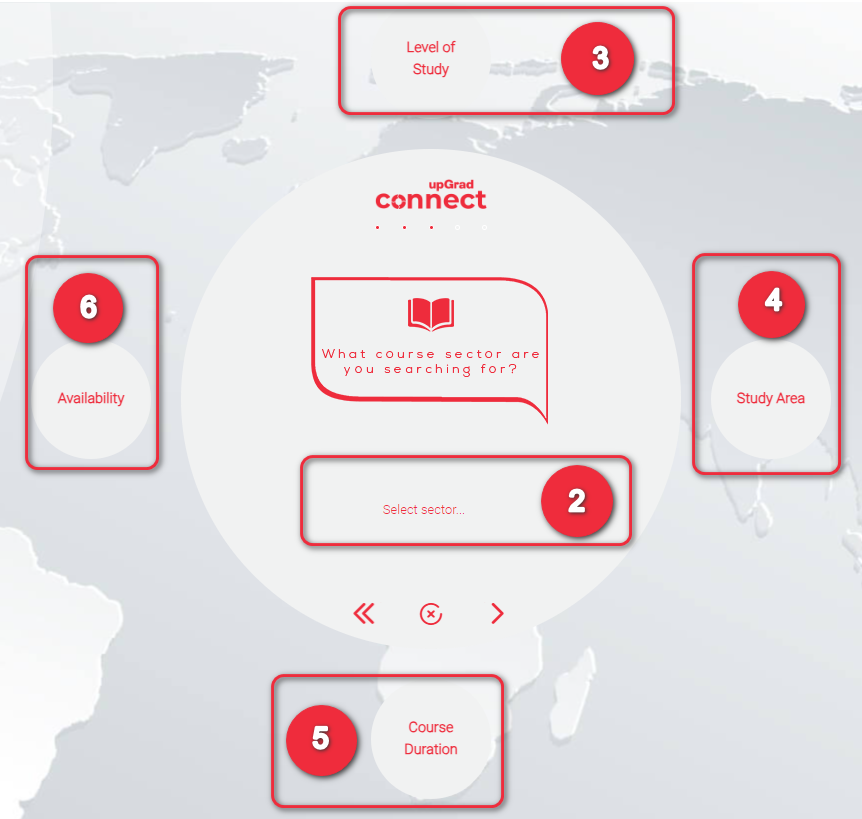
Course Type Filter are other attributes of a course. You can narrow the search result by using the following filters:
Course Sector
By Level of Study
By Area of Study
By Course Duration
By Availability – the date intake/ start of a course
1
2
Click Select sector to display the list of countries with available institutions.
The Course Sector list is composed of the following:
School English Pre-Degree & Vocational
Undergraduate Postgraduate
2.1 Click the course sector that the Student would like to study.
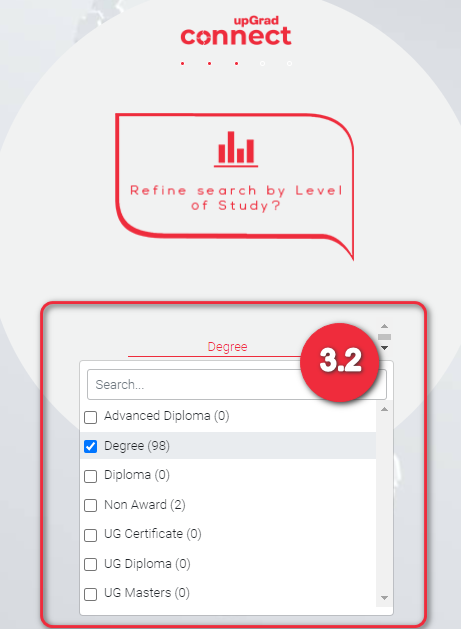
Click Level of Study if you want to use this filter.
3
3.1 Click Select level of study to display the list that you can choose from. If you used the course sector filter, then level of study filter will only show items under the course sector/s you have selected.
Each level of study choices depends on the sector you selected:
School
Primary School
Secondary School
English
English Langauage
Pre-Degree & Vocational
Advanced Diploma
Certificate
Diploma
Foundation
UG Certificate
Year 11
Year 12
Undergraduate
Advanced Diploma
Degree
Diploma
Non Award
UG Certificate
UG Diploma
UG Masters
Postgraduate
Degree
Doctorate
Masters
Non Award
PG Certificate
PG Diploma
PG Masters
3.2 Click the level of study to select it. You can also select multiple items.
3.3 At the bottom of the bubble are some quick action buttons to do the following:
Go back to Main Search bubble to Search Now or Reset
Remove all selected values
Go to next filter, study area.
Click this to select another filter you would like to use. This also allows you to view your previous selections. You will not lose your selections when you click this.
3.4 Text display of the Level of Study you have selected
4
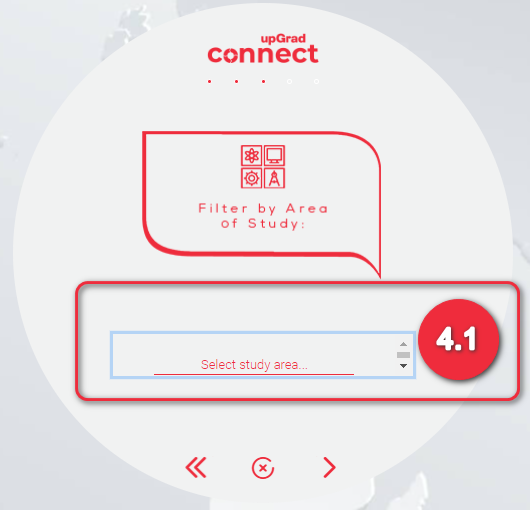
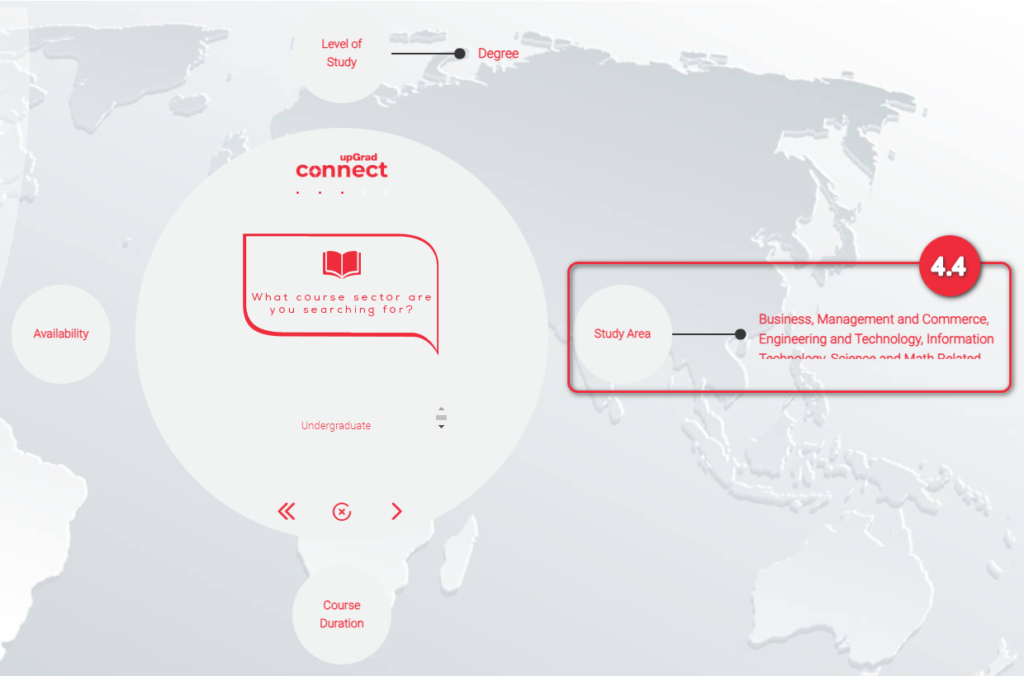
Click Study Area if you want to use this filter.
4.1 Click Select study area to display the list that you can choose from.
The Study Area list is composed of the following:
Agriculture & Environmental
Arts Related
Business, Management and Commerce
Education and Training
Engineering and Technology
Information Technology
Literature, Language, and Social Science
Medicine, Nursing & Allied Health
Science and Math Related
Each Study Area is composed of a more specific study area. Below is the list of the specific study area and to which they are grouped under:
Agriculture and Environmental
Agriculture and Related Sciences
Agriculture, Environmental & Related Studies
Natural Resources and Conservation
Parks, Recreation, and Fitness
Arts Related
Arts, Humanities And Social Science
Arts, Visual and Performing
Creative Arts, Design And Communication
Multi/Interdisciplinary Studies
Business, Management and Commerce
Business
Business, Commerce And Management
Food, Hospitality And Personal Services
Education and Training
Area, Ethnic, Cultural, and Gender Studies
Education
General Primary and Secondary Education
Engineering and Technology
Architecture And Building
Architecture And Planning
Construction Trades
Engineering
Engineering and Related Technologies
Engineering Technologies
Mechanic and Repair Technologies
Transportation & Materials Moving
Information Technology
Computer and Information Sciences
Information Technology
Literature, Language, and Social Science
Communication and Journalism
Communications Technologies
English Language and Literature
Family and Consumer Sciences
History
Languages, Literatures, and Linguistics
Law and Legal Studies
Liberal Arts and Sciences, General Studies, and Humanities
Library Science
Philosophy and Religion
Psychology
Public Administration & Services
Security & Protective Services
Social Sciences
Theological Studies & Religious Vocations
Medical, Nursing & Allied Health
Health Professions and Related Clinical Sciences
Health, Medicine And Veterinary Studies
Personal and Culinary Services
Science and Math Related
Biological and Biomedical Sciences
Math and Statistics
Natural and Physical Sciences
Physical Sciences
Science Technologies
4.2 Click the Area of Study that the Student is interested in. You can select multiple items. You can also type the required study area to easily search the list instead of using the scrollbar
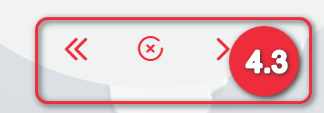
4.3 At the bottom of the bubble are some quick action buttons to do the following:
Go back to Main Search bubble to Search Now or Reset
Remove all selected values
Go to next filter, study area.
Click this to go to the next filter. You will not lose your selections when you click this.
4.4 Text display of the Area of Studies you have selected.
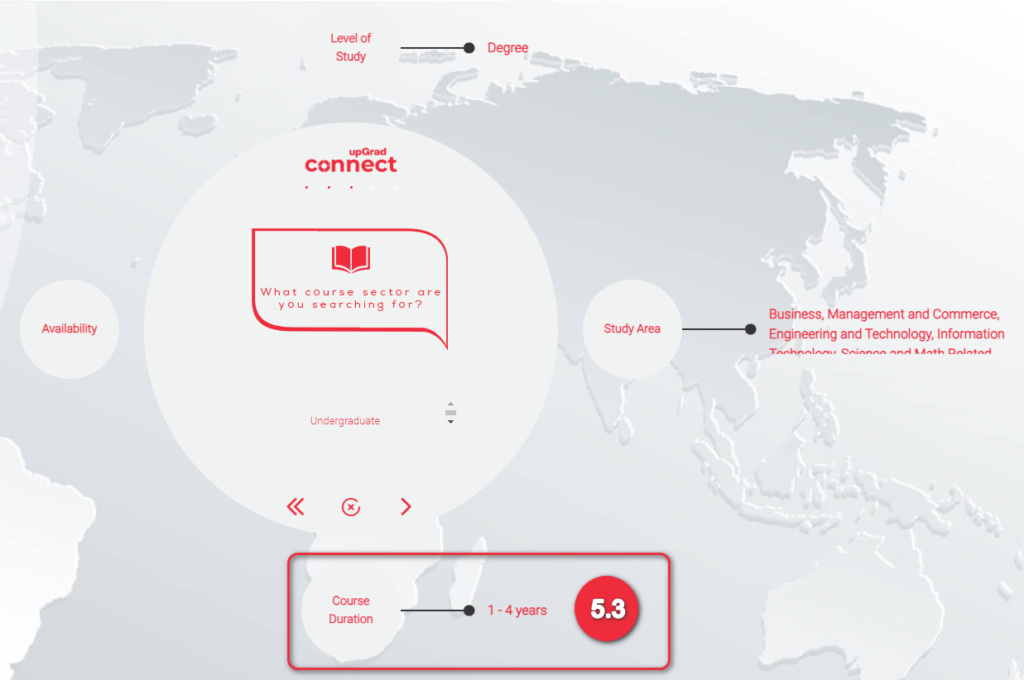
Click Course Duration if you want to use this filter
5
5.1 Drag both endpoints to identify the course duration that the student would like. By default this is set to 0-2years.
Example: 1 – 3 yrs
Example: 2 – 4 yrs
5.2 At the bottom of the bubble are some quick action buttons to do the following:
Go back to Main Search bubble to Search Now or Reset
Remove all selected values
Go to next filter, Course Duration.
Click this to go to the next filter. You will not lose your selections when you click this.
5.3 Text display of the course duration you have selected
6
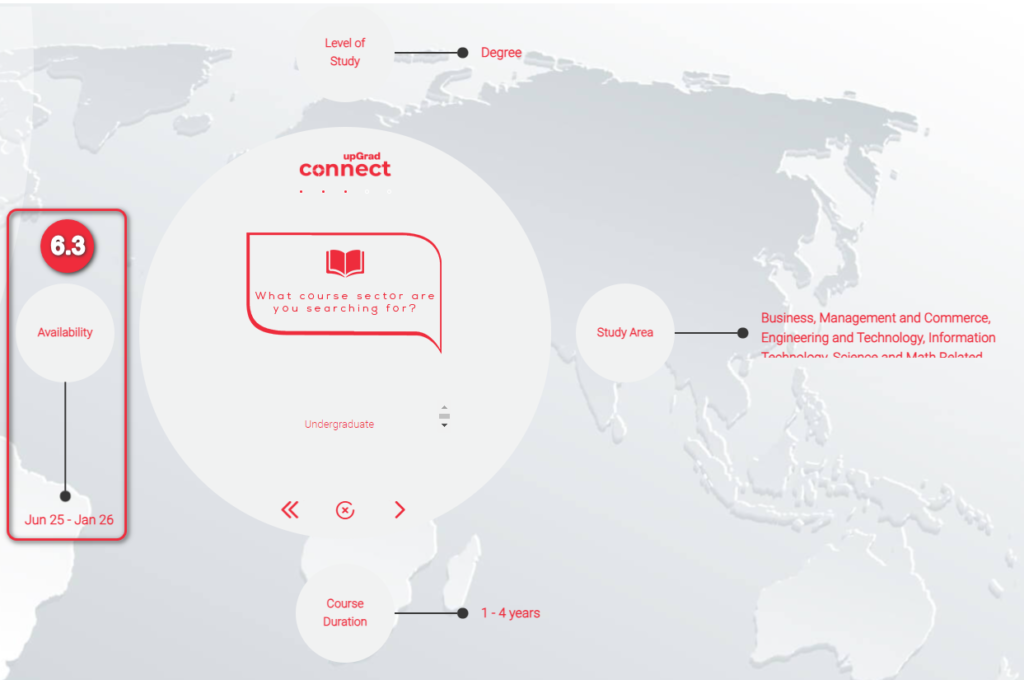
Click Availability if you want to know if the course type chosen is available for that duration of time
6.1 Drag both endpoints to identify when the student would like to start his/ her study. The endpoints represent the month and year (May 2022). The month at the left most is based on month today. In this example, May 24 – Nov 24 means that student wants to study within 6 months from the course application date.
The Student would like to start their studies anytime between August 2024 and October 2025
The Student would like to start their studies anytime between July 2025 and January 2026.
6.2 At the bottom of the bubble are some quick action buttons to do the following:
Go back to Main Search bubble to Search Now or Reset
Remove all selected values
Go to next filter, Course Duration.
Click this to see all the filters you used in Course Type. You will not lose your selections when you click this.
6.3 Text display of the availability you have selected.
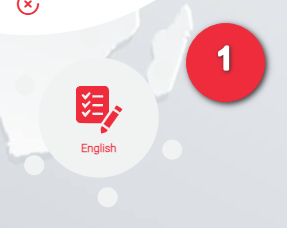
English Filter are other attributes about a course. You can narrow the search result by using the following filters:
Cambridge Assessment English
Duolingo English Test
IELTS
TOEFL iBT
TOEFL pBT
PTE (Pearson Test of English)
1
2
Click the type of English test that the Student has taken.
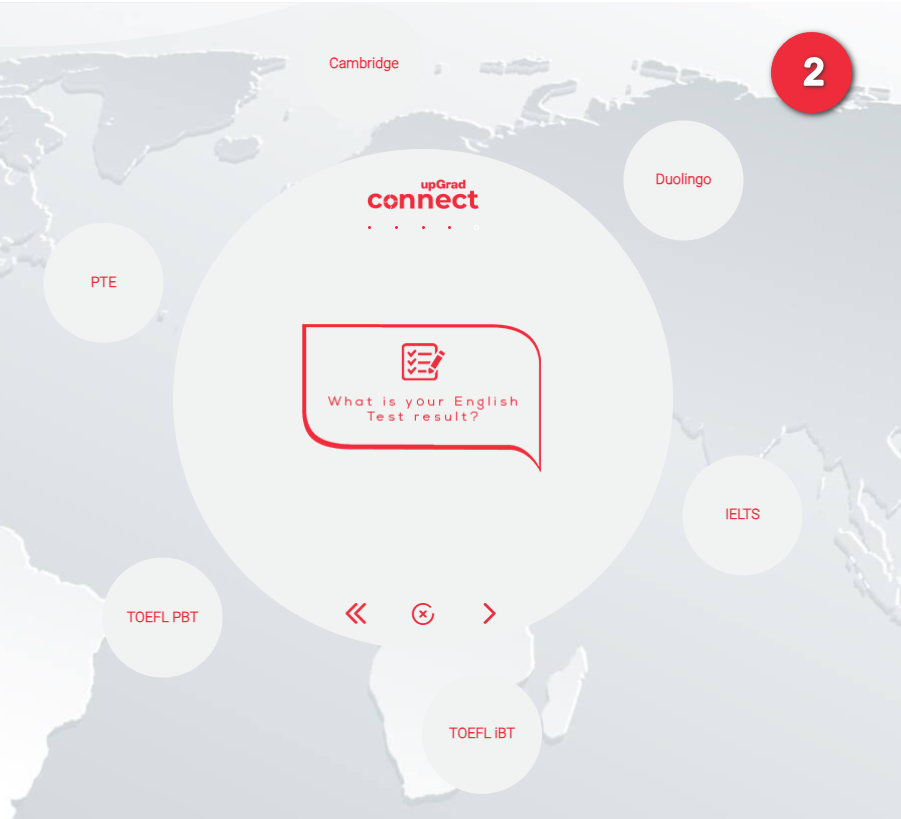
2.1 Select the English exam score that meets the Student’s requirement.
The selected score here will be the maximum score in the search results. You can only use one English test type filter.
Example. If you selected, IELTS 7.0, the results will also give courses that have less than IELTS 7.0 as an entry requirement so you will have a larger range of courses to choose from.
2.2 Click a test score to select it.
2.3 At the bottom of the bubble are some quick action buttons to do the following:
Go back to Main Search bubble to Search Now or Reset
Remove all selected values
Go to next filter, Course Duration.
2.4 Text display of the English test type and score you have selected. Notice that the others were disabled. Clear your search if you want to enable and use other filter.
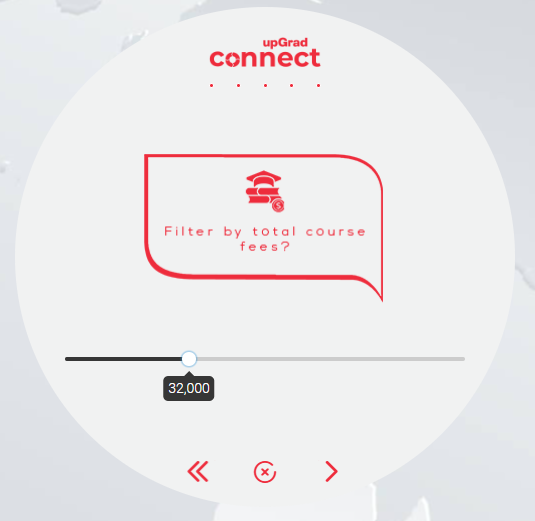
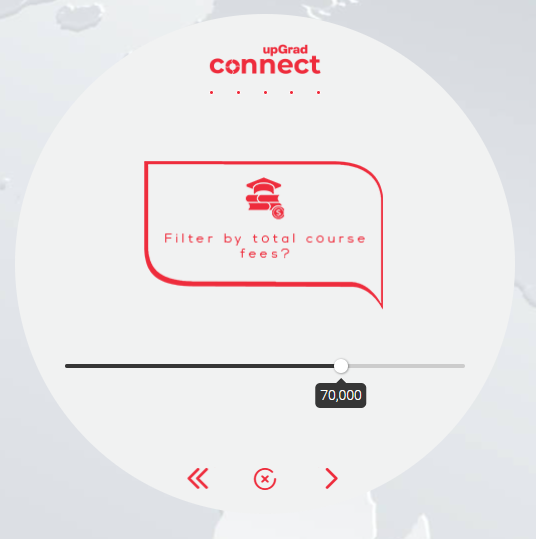
Course Fees are other attributes about a course. You can narrow the search result by using the following filters:
Total Course Fee
Annual Fee
Click any of the two that you think is more usable for the student.
2
Drag the endpoint to identify the maximum annual course fee that the student is willing to pay for. This is also the budget of the student. This goes the same for the annual course fee.
The Student would like to study a course with a maximum course fee of 32,000 AUD.
The Student would like to study a course with a maximum course fee of 70,000 AUD.
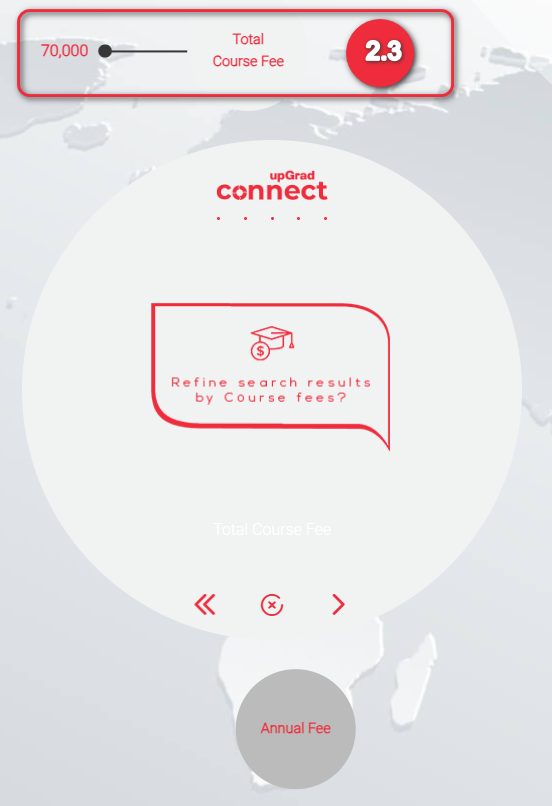
At the bottom of the bubble are some quick action buttons to do the following:
Go back to Main Search bubble to Search Now or Reset
Remove all selected values
See all the filters you have selected.
Click this to see the filter you used in Course fees.
When you go back to full view, all the filters that you have used are displayed with your selected items. Click ‘Search Now’. Click ‘x’ at the bottom if you want to clear all search filters.
1.1 Display of the summary of your course search
No. of Courses found
No. of Institutions found
Refine search. Click if you want to change your filters. This might come in handy when it returns a lot of results.
View search result. Click if you want to view the details of results. If this is disabled it means that the the result has a lot to display and might not be usable for you to check all those courses. Instead, click ‘Refine Search’ to go back and use more filters.
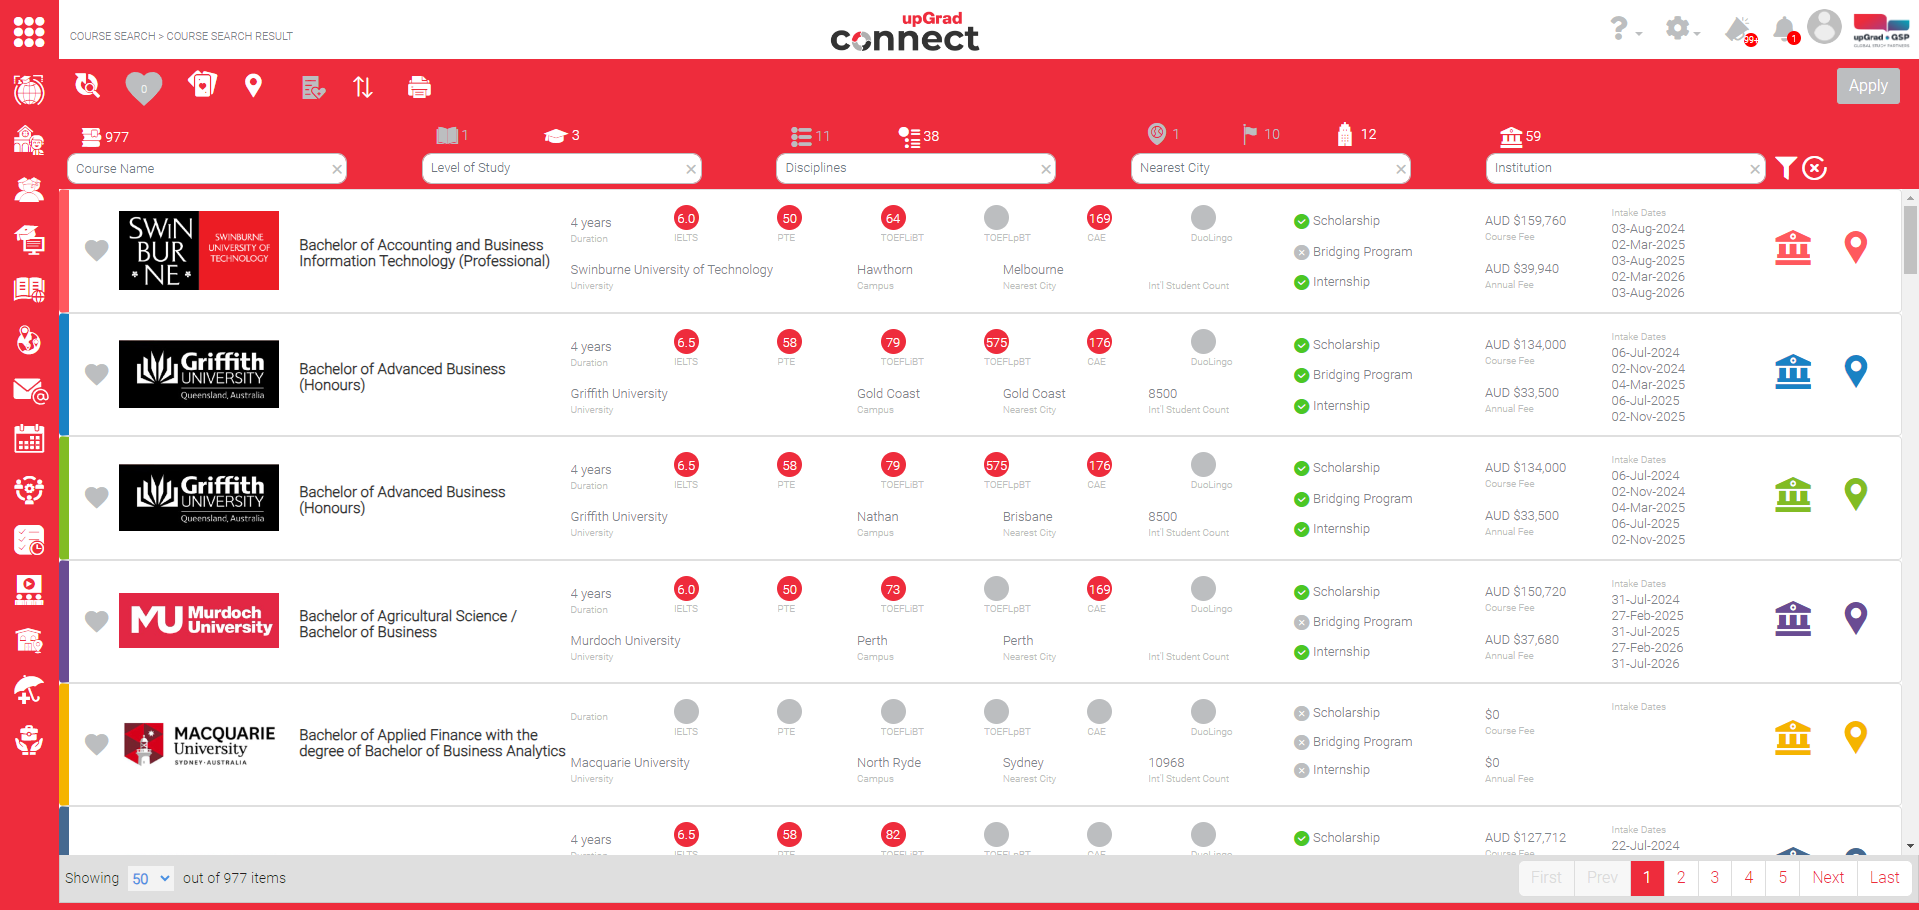
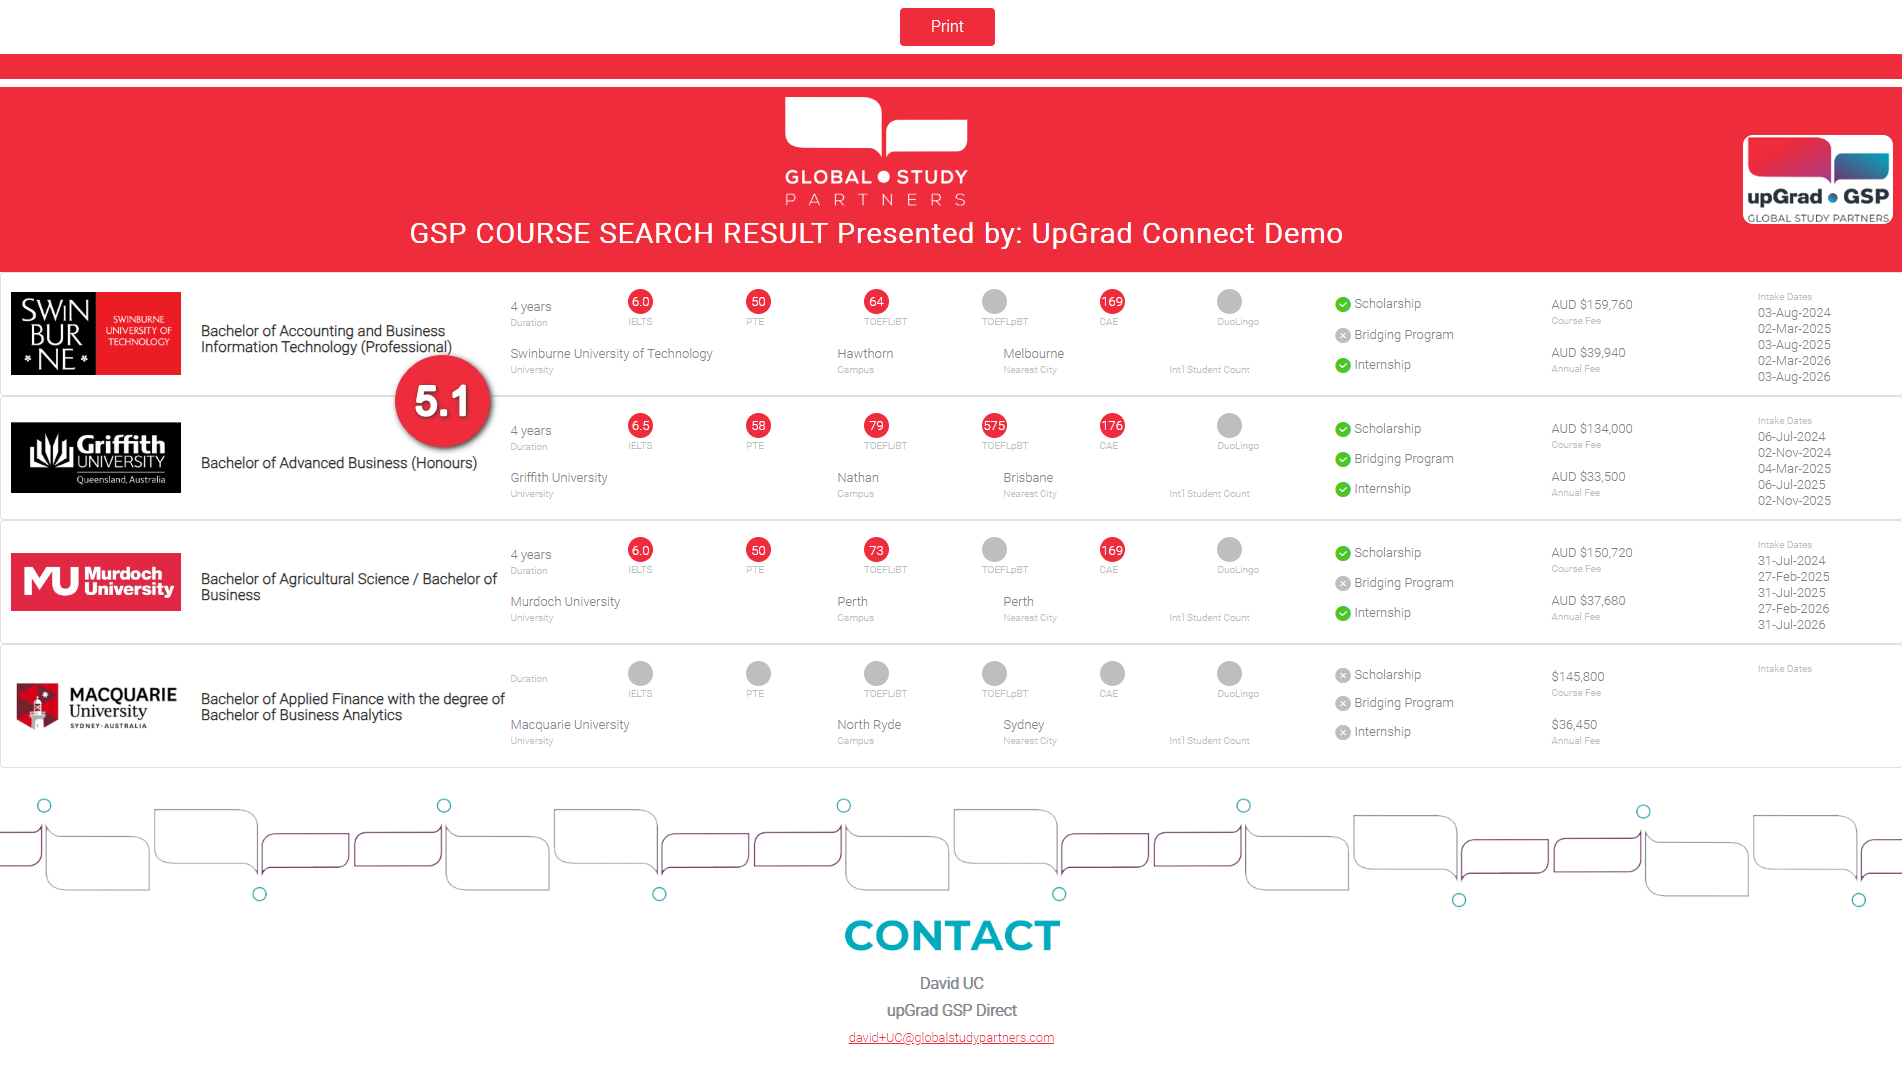
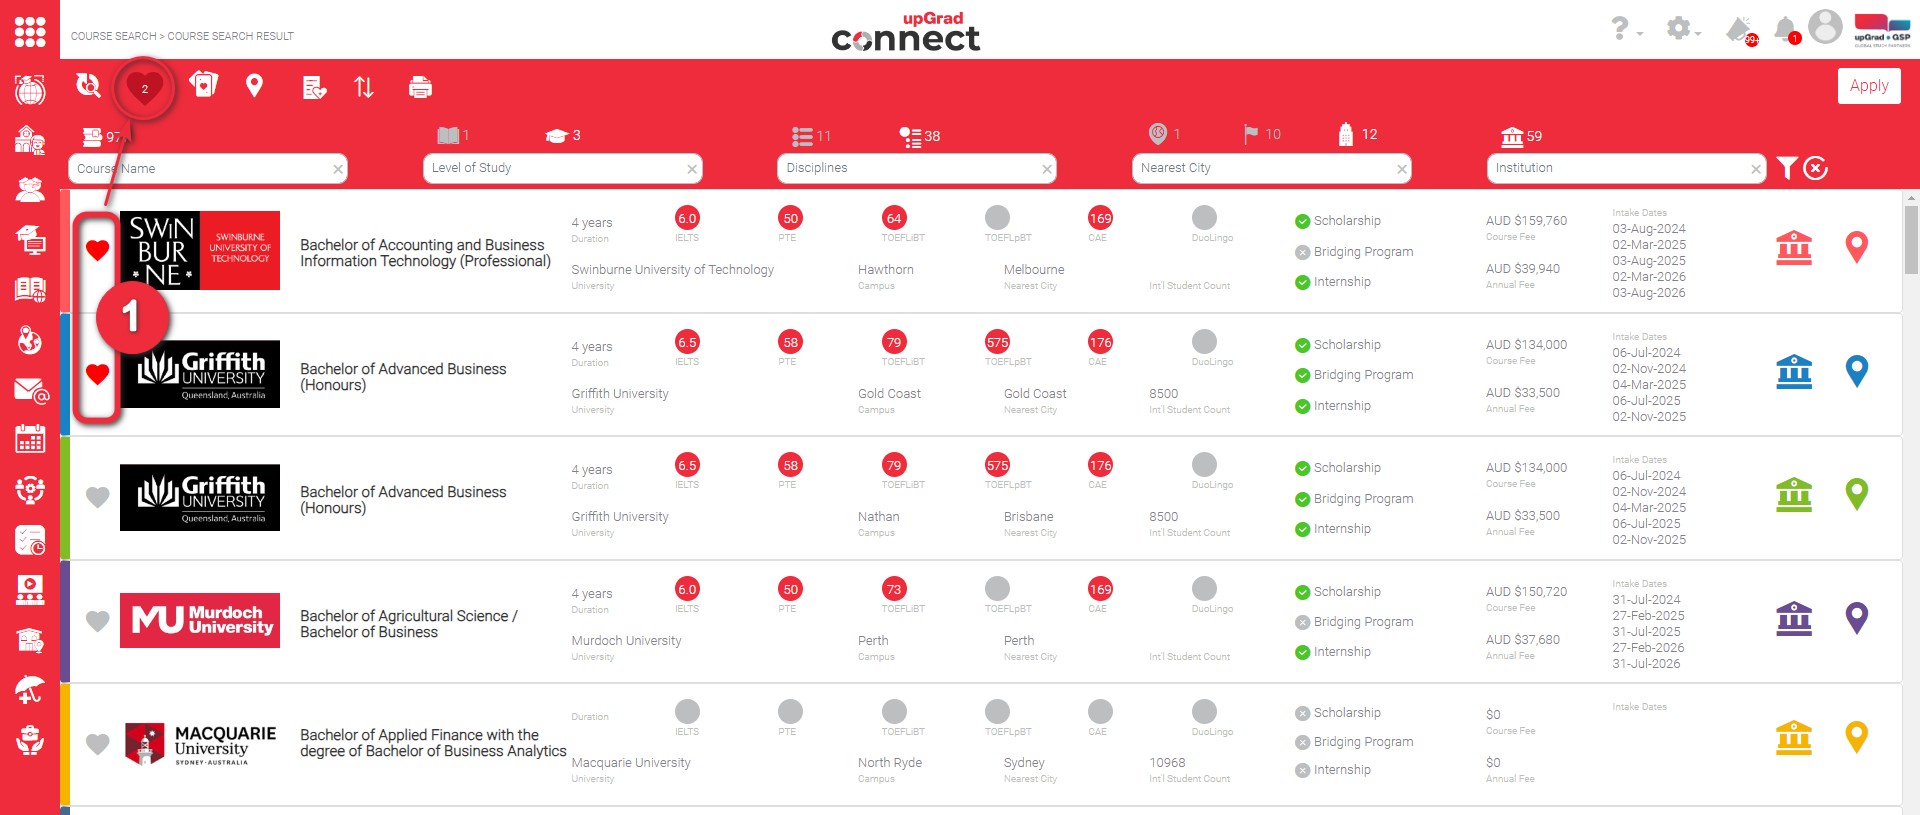
This is what the Search Results Page looks like. This view is also called the Summary list View.
The page displays the following details:
Complete course name
Institution where the course is offered
Course duration
English test score requirement by type
Specific Campus where the course is offered. Courses may be offered to multiple campuses so make sure to apply for the correct campus.
Nearest city the campus is located
International Student Count for those students who wanted a diverse environment for better exposure
Green mark if Scholarship is offered and grey if not
Green mark if Bridging program is offered and grey if not
Green mark if Internship is offered and grey if not
Course Fee in local currency
Annual course fee in local currency
Intake dates. These are the dates when class will start.
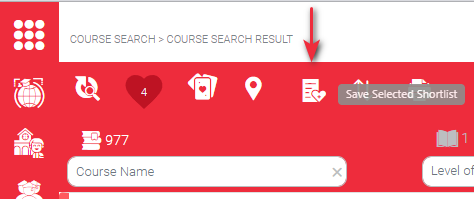
Notice that there are 7 quick action buttons at the top right, namely:
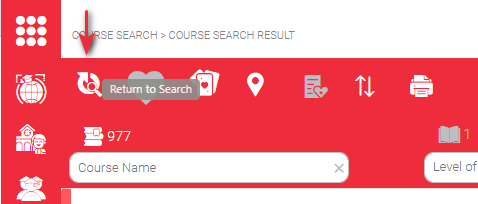
Return to Search. Click this circular arrow button to return to Search/ previous page.
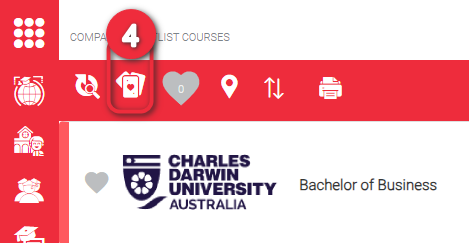
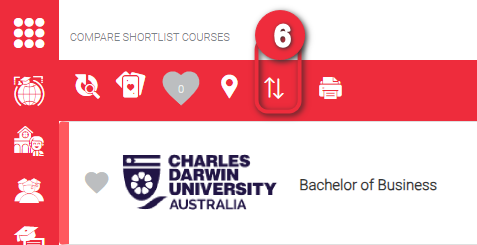
Compare selected Courses. This heart button navigates you a a different view where you can compare all the courses you have selected.
A separate section, Compare Courses, has been dedicated for this.
Cards View. This Card View button gives you the options being displayed on a card. One card for each course.
Details on the Card view can be found in a separate section named – Card View.
Map View. This pin button navigates you to a map view where you can see the location of campuses in your course search result. Further has been discussed on the Map View section below
Save Selected Shortlisted View. This will take you to the list of courses shortlisted for your students.
Sort Details. This button gives you the option to sort out the list in ascending or descending order by Institution Name, Nearest City, Course Fee, Annual Fee.
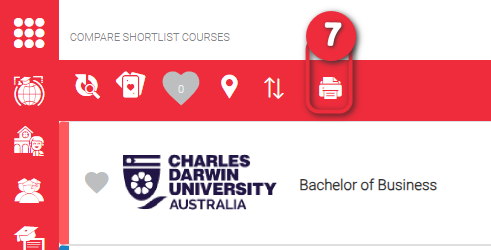
Print: Select courses which you would like to print by checking the boxes found at the leftmost side of each row.
The way to use these quick action buttons are further explained below.
2
Select courses which you would like to apply, shortlist, compare, or print. by checking the boxes found at the leftmost side of each row.
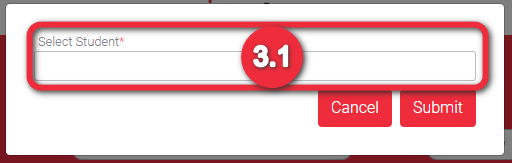
With the course selected, press the Save Selected Shortlist button to save the chosen course as a preference for your student.
3
A new box appears which will ask you to select the student. Click on the blank space to open the drop down menu.
Select the student from the drop down. If the student is not available you can also search from the search bar appear on the top inside the dropdown. You can search from the student’s name or student ID, if you know it.
Here, we have selected the student by using the search bar. Once you click the student’s name, the dropdown menu collapses and the student’s name can be seen inside the box.
Now click on:
3.4 Cancel button to Cancel the student selection. 3.5 Submit button to submit the selection.
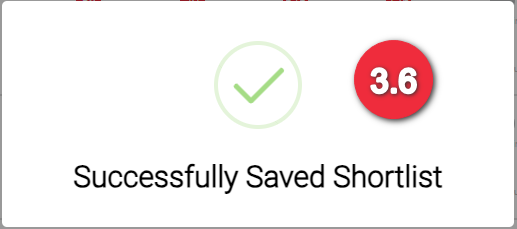
You will receive a notification as shown (3.6) once the shortlisted courses are saved under a student. You will be able to see the shortlisted course from the student’s profile.
4
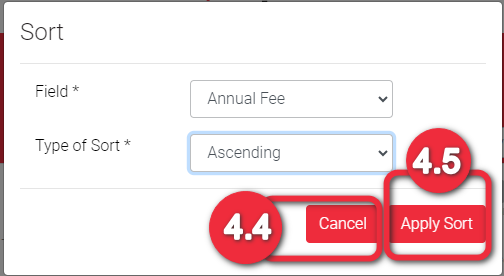
Click on the sort action button to sort (ascending or descending) the displayed list.
4.1 Clik on the field to select from the drop down menu.
4.2 Select the field that you want to sort the list with. Here we take Annual Fees as an example.
4.3 Next is the type of sorting to select – ascending or descending.
You could cancel the sorting by clicking on Cancel button (4.4)
If you want to apply the sorting, click on Apply Sort button (4.5).
Once the sorting is applied, the display changes as per the sorting instruction.
5
Select courses which you would like to print by click on the heart icon in front of each course found at the leftmost side of each row. See step 2 for reference.
5.1 Upon clicking print button, a new tab in your browser should open listing the courses you have selected for printing. Click print to open the print window.
5.2 Select all appropriate options and proceed in printing as normally you would.
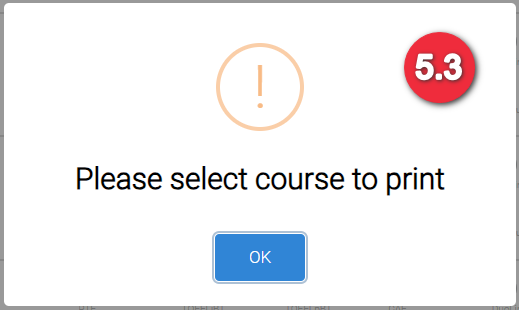
5.3 If you have not selected at least one course to print, this alert message will appear. Click OK to remove this so you can select courses.
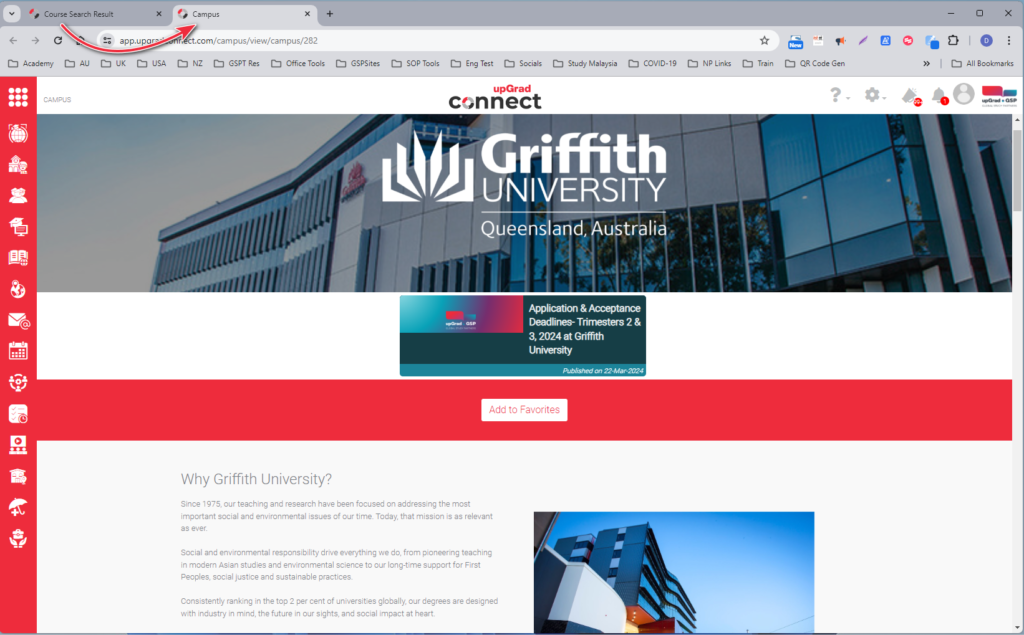
Each line in the summary list view has the Institution Icon and Map View Icon on the right end. You can click on these icons to get information about the institution or location information.
6
6.1 Click this to find out more about the Campus. Click here to learn more about this Campus page.
6.1.1 The campus information page will open in your browser’s new tab..
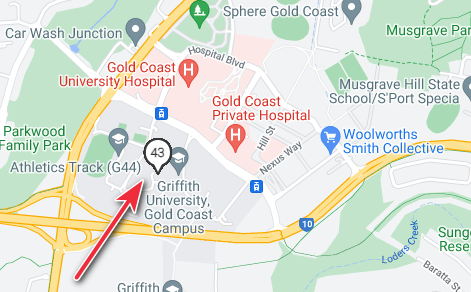
6.2 Click this pin to view the location of the campus in the world map.
6.2.1 The grey pin is the location of the campus that you have clicked
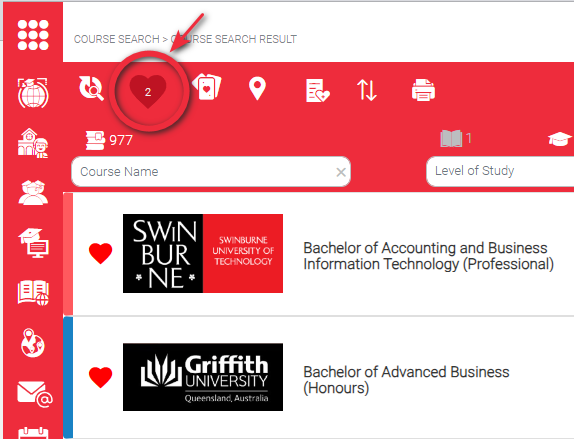
At this point you have not narrowed down your search. If you want to narrow down your search first, you can have a look at the Refine Search, section on this page. At this stage, you may want to see which institution offers the cheapest course but with the same value as internationally recognised ones. To compare course details with a better view, click the heart at the bottom right of the course card.
1
1.1 Each heart you click will be filled with red. There is no maximum number of courses that you can select from the course cards.
2
Notice that the count inside the heart at the top left corresponds to the number of courses you hearted. Click this to view all the courses that you want to compare.
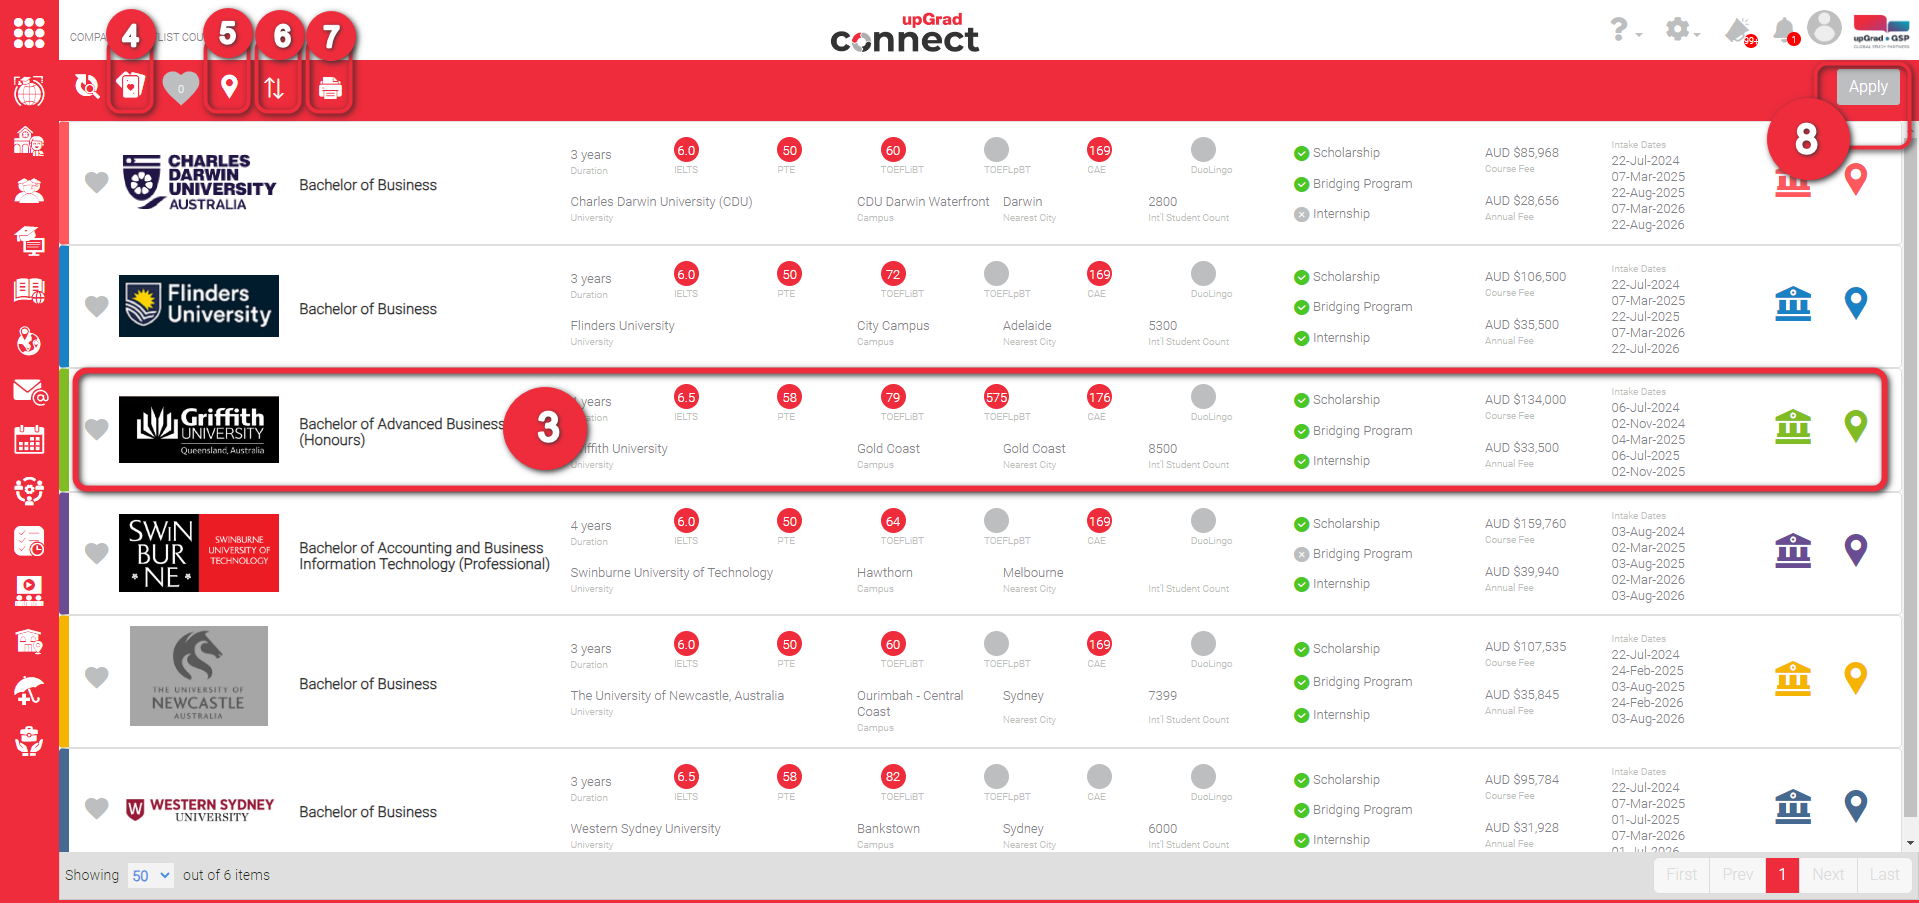
You will be redirected to a list of all courses that you selected for comparison. Each row you will find the following course details:
Complete course name
Institution where the course is offered
Course duration
English test score requirement by type
Specific Campus where the course is offered. Courses may be offered to multiple campuses so make sure to apply for the correct campus.
Nearest city the campus is located
International Student Count for those students who wanted a diverse environment for better exposure
Green mark if Scholarship is offered and grey if not
Green mark if Bridging program is offered and grey if not
Green mark if Internship is offered and grey if not
Course Fee in local currency
Annual course fee in local currency
Intake dates. These are the dates when class will start.
The colors do not represent anything. It just helps you look at the correct row at a time.
3
4
Click this icon to go to the Cards View. As we have already selected the courses to compare, you will only see those selected courses in the Card View.
Click this pin to view the location of the campus in the world map. Again only the location of those courses listed here will be shown in the Maps View.
Click the sort action button to sort (ascending or descending) the list by:
Institution Name
Nearest City
Course Fee
Annual Fee
This is also explained in the Step 4 of previous section above.
Select the courses you would like to print by selecting the heart icon on the leftmost side of each row. You can also refer to Step 5 of previous section above.
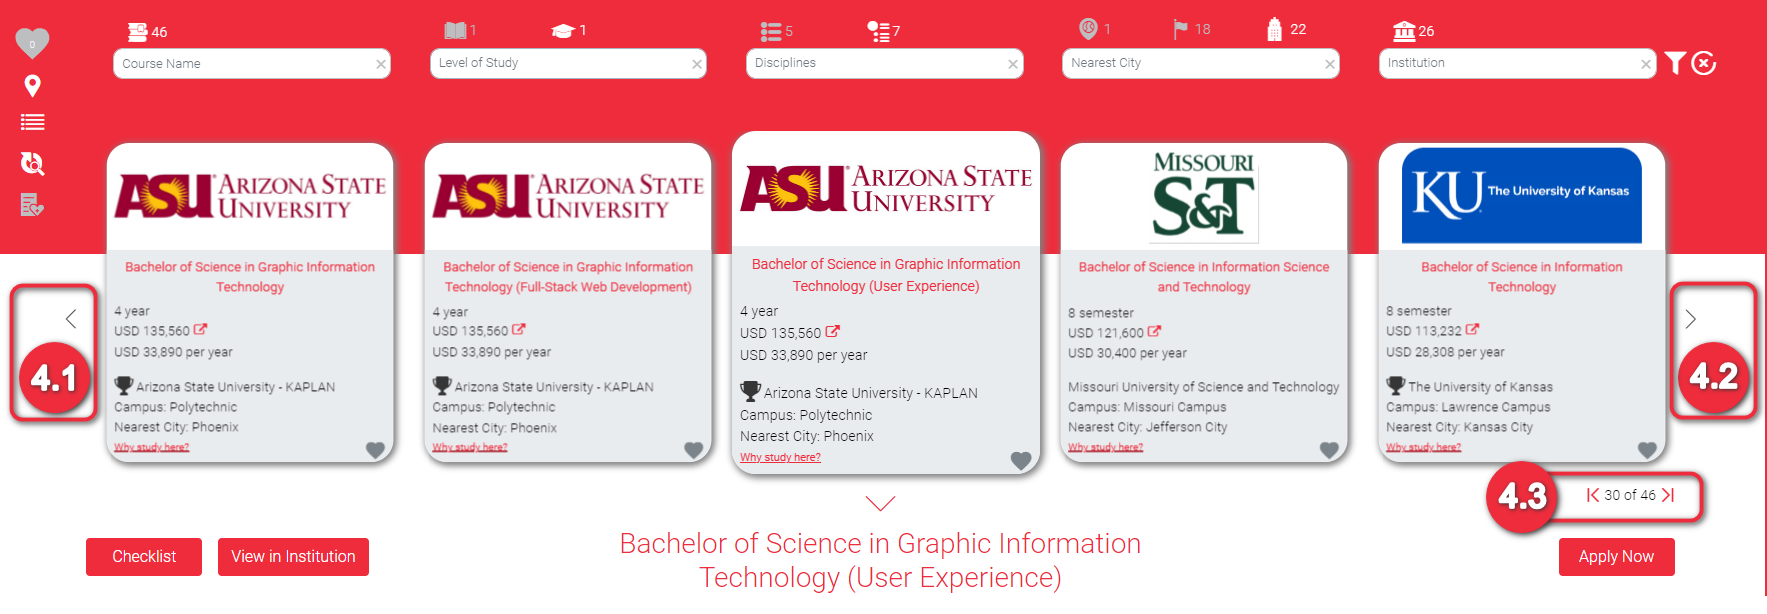
You can refine the search results from the original results. This is helpful in narrowing down the results to the best courses that fits the student requirements. Notice how extensive the refine search is. All the icons in white and grey represent a filter that you can use. If the icon is white, this means it is the active filter. Click the grey icon (inactive) to switch filters.
Course Name is a text box where you can type any word that a course title may have. Above the text box is a number which indicates the number of courses you will search from.
Example: There are 14 courses that resulted from your original course search. Among these 14 courses, you would like to see which course titles have the word ‘Engineering’. However, if you did not type any then, the search engine will not refine based on the course name.
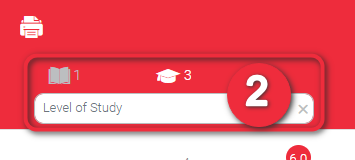
You can narrow your search results by using Level of Study. Click this to display the specific Level of Study that you can choose from. This multi-select list box is based on the search results. Thus, the number indicates how many study levels are there from the search results.
Example: There are 14 courses that resulted from your original course search. These courses can be any of the following Level of Studies:
Associate Degree
Bachelor Degree
Dual Degree
If you want to narrow your search and want to disregard Associate Degree, click Bachelor Degree and Dual Degree to put checkmarks on them. However, if none of the items on the list are checked then the search engine will include them all on the list.
2
2.1 You can narrow your search results by using Course Sector. Click this to display the specific Course Sector that you can choose from. This multi-select list box is based on the search results. Thus, the number indicates how many course sectors are there from the search results.
Example: There are 14 courses that resulted from your original course search. All courses are tagged to only one course sector, that is Undergraduate
3
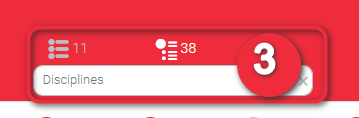
You can narrow your search results by using Disciplines. Click this to display all the academic disciplines that you can choose from. This multi-select list box only displays the disciplines based on the search results. Above it is a number which indicates the number of disciplines from the search results.
Example: There are 14 courses that resulted from your original course search. Each course is tagged to one of the following Disciplines:
Accounting
Business Management
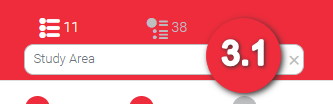
3.1 You can narrow your search results by Study Area. Click this to display the study areas that you can choose from. This multi-select list box only displays the study areas based on the search results. Above it is a number which indicates the number of study areas from the search results.
Example: There are 14 courses that resulted from your original course search. Each course is tagged to one of the following Area of Studies:
Information Technology
Computer Science
Engineering and Related Technologies
Architecture and Building
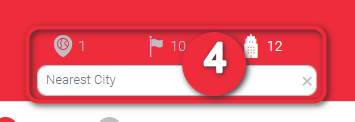
You can narrow your search results by using Nearest City. Click this to display all the cities that you can choose from. This multi-select list box only displays the Area of Study based on the search results. Above it is a number which indicates the number of cities from the search results.
Example: There are 14 courses that resulted from your original course search. Each course is tagged to one of the following cities:
Sydney
Gold Coast
If you want to narrow your search and want to disregard Sydney, click Gold Coast to mark it with a check. However, if none of the items in the list are checked then the search engine will include all in the list.
4
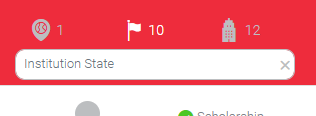
4.1 You can narrow your search results by using Institution State. Click this to display all the institution states that you can choose from. This multi-select list box only displays the states based on the search results. Above it is a number which indicates the number of institution states from the search results.
Example: There are 14 courses that resulted from your original course search. Each course is tagged to one of the following states:
New South Wales
South Australia
If you want to narrow your search and want to disregard New South Wales, click South Australia to mark it with a check. However, if none of the items in the list are checked then the search engine will include all in the list.
4.2 You can narrow your search results by using Country. Click this to display all the countries that you can choose from. This multi-select list box only displays the countries based on the search results. Above it is a number which indicates the number of countries from the search results.
Example: There are 14 courses that resulted from your original course search. All courses can be found in one country, Australia.
If you want to broaden your search go back to the Course Search Page.
5
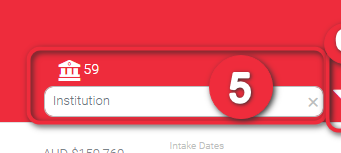
You can narrow your search results by using Institution Click this to display all the Institutions that you can choose from. This multi-select list box only displays the Institutions based on the search results. Above it is a number which indicates the number of Institutions from the search results.
Example: There are 14 courses that resulted from your original course search. These 14 courses are found in the following institutions:
Charles Darwin University (CDU)
Western Sydney University (WSU)
If you want to narrow your search and want to disregard WSU, click CDU to mark it with a check. However, if none of the items in the list are checked then the search engine will include all in the list.
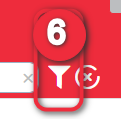
If you are satisfied with all the selections to narrow your search, click this funnel. Expect a smaller number of course results to be displayed in the course cards.
6
7
Click this to reset all the values you have selected at once.
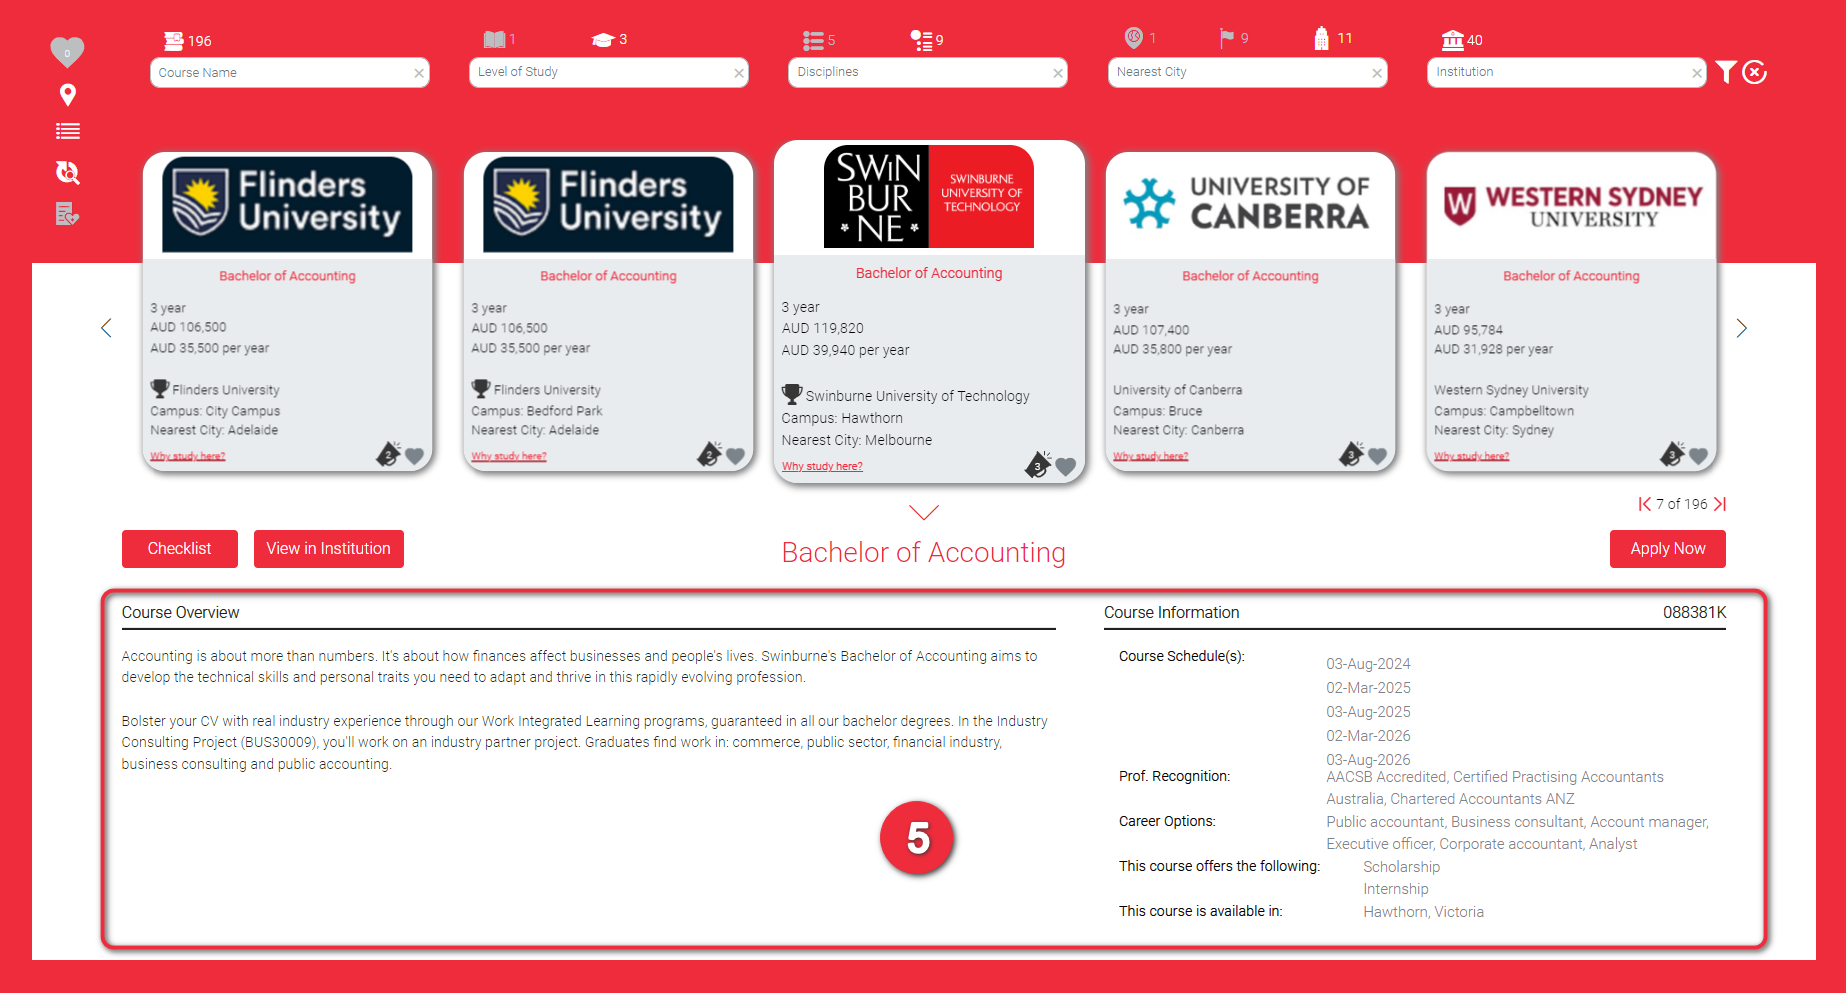
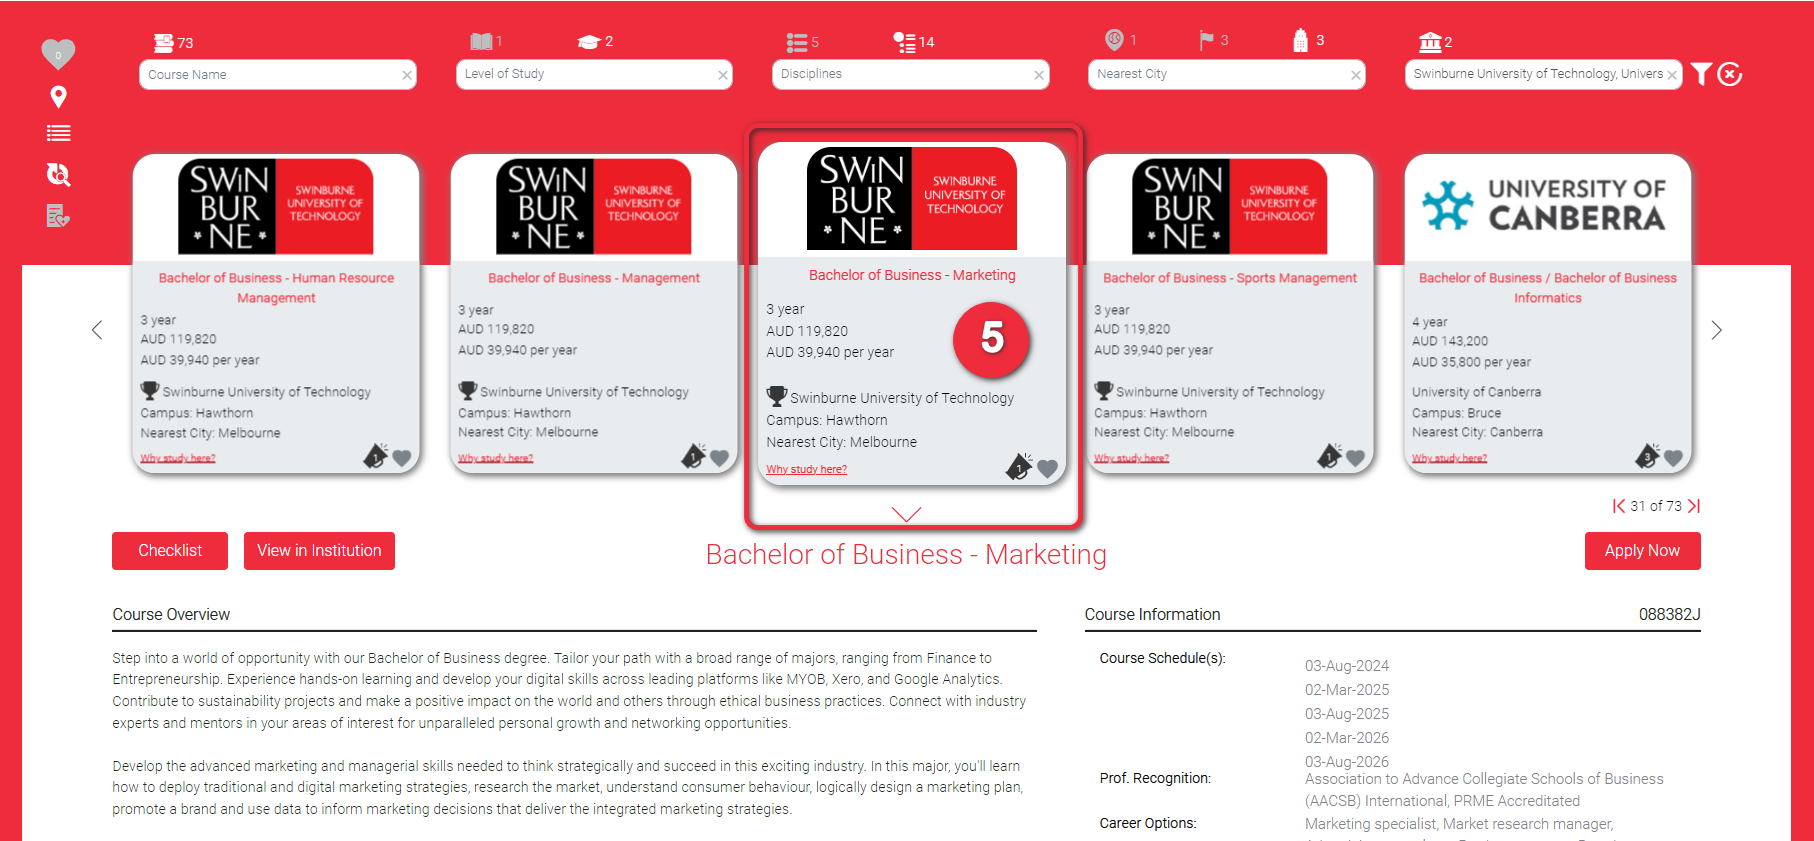
The Cards view is another type of view that lists all the search results in the form of a card. 5 Cards are displayed at a glance.
The Course Details has lots of helpful elements. The summary of course details is displayed in a card format. The course card is composed of the following details:
Institution logo to easily identify which institution the course is connected to Complete course name Duration of the course Total course fee Annual course fee Institution name Campus Nearest city from where the campus is located
A trophy beside the institution name is displayed when the institution world ranking is identified. Hover here to find it out.
2
For some course cards you may find an arrow beside the total course fee. This indicates that the course has other fee details. Click this to flip the card and view more details.
3
3.1 This is where you can find the other fees details. When you are done reading, click the rounded arrow at the top of the course card to flip back to summary of course details.
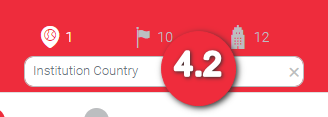
4
4.1 and 4.2 Click the left arrow or right arrow to view other course cards.
4.3 Tells you how many course cards are available based on your search. The first number tells you which card’s details is displayed. Let’s say it is |< 14 of 14 >|, then it means you have already reached the end of the card view. Click the left arrow to go back to previous course cards.
Click the course card (any spaces you see in the card) to display below more of the course details where you’ll find the following:
Course Overview. Description of the course
Course Schedule. Start of classes
Professional Recognition. Third party organisation accreditation, such as ‘Nationally recognised – meets AQF standards Level 6’
Career Options. employment and career opportunities related to the course outcome, such as Project Manager, Office Manager, Administration Manager
Offers like scholarships or bridging programs
Campuses where the course is available. This is a new feature designed to guide you to the relevant campus and is especially helpful if you have a preferred location in mind.
5
6
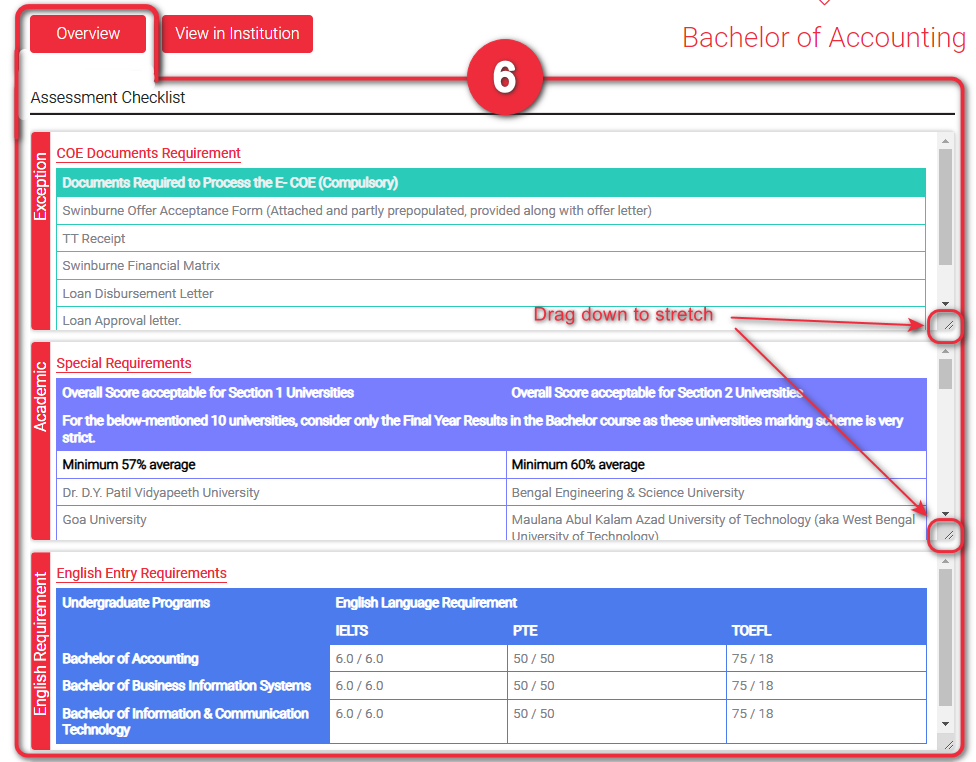
Click ‘Checklist‘ button, found just above the Course Overview. This will display the following academic requirements or checklist details. It can list down
Exceptions
Generic or Country specific academic requirements
English test score requirement
Personal document requirements include CV, work experience, Passports and IDs
Financial Matrix Forms, and other matters related to genuineness
Financial Requirements and processes.
Each section can be stretched to full view by dragging the bottom right corner of each section as shown in the image below.
For more on how to use this checklist too, please see ‘Assessment Tool‘ page.
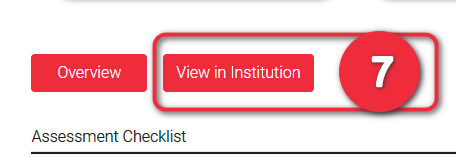
When the requirements are displayed, the ‘Checklist‘ button is turned to the ‘Overview‘ button.
Click ‘View in Institution‘ button to open this course in the respective institution’s website.
7
8
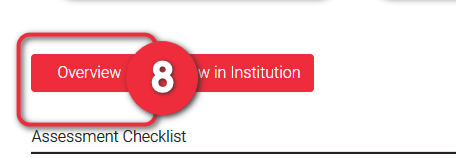
Click ‘Overview‘ button to go back to previous course details display.
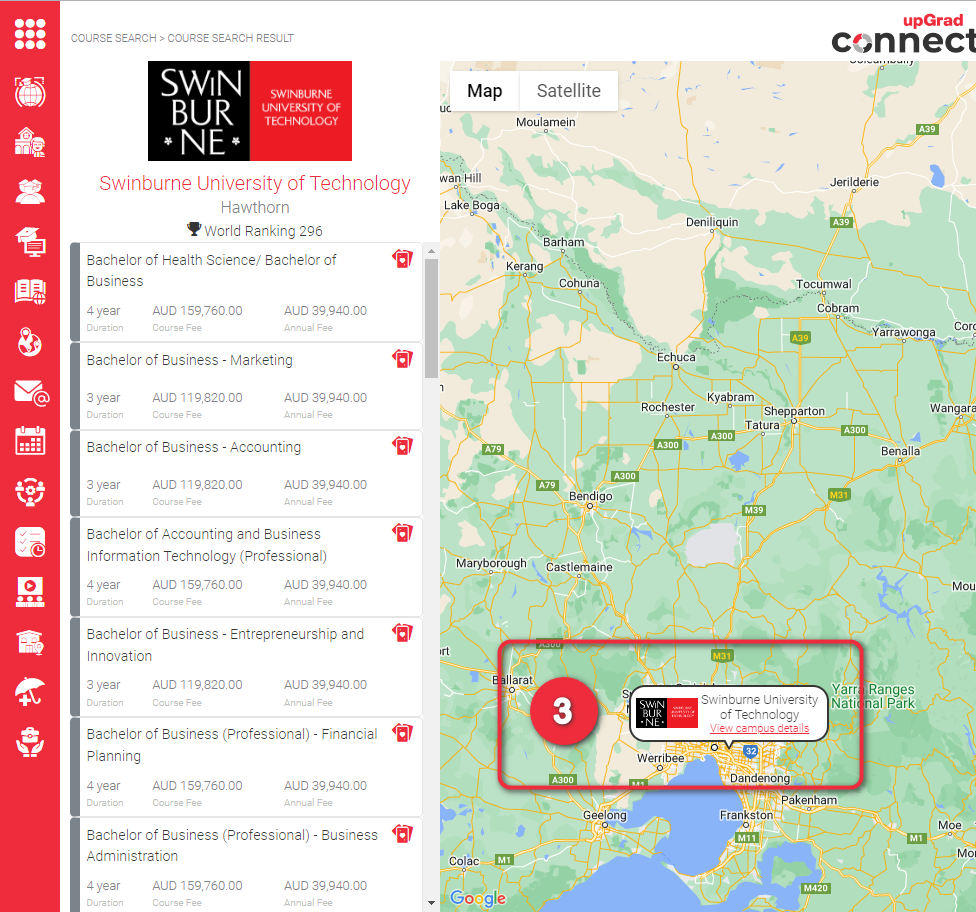
Click Map View to see all the campus locations (in a form of a map) where the courses in the search results are offered. This is very helpful to visualise the distance of a campus let’s say from the coast or a city that a student would like to reside. This is also helpful in determining the possible directions that student can take from his/ her apartment to the campus.
Take note of the selected course in the course, Bachelor of Accounting and Business Information Technology. You’ll need this in the next step.
You can also view the campus location from Course Card View. The same course has been selected in the card View.
1
2
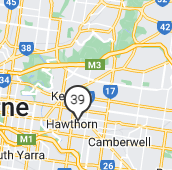
This map shows all the campus locations of the courses in the search result. The number in each pin indicates the number of courses are there from the search results.
Notice that one location/ pin is color purple and the rest are in green.
Grey pin is the location of the course selected in the search results, ‘Bachelor of Accounting and Business Information Technology’ from Australian National University in Canberra.
2.2 Pins with this color means that these are the other locations (not selected) in the search results.
Click the location pin that you would like to view. Upon clicking, a tooltip will appear to indicate the institution name and a link to learn more about the campus.
3
4
These are the courses offered in the same campus based on your search results.
Only the highlight details are indicated here per course:
Complete course name
Duration
Total course fee
Course annual fee
4.1 In case you are interested to see other courses offered in the campus, click View Course Details
You will be redirected back to the Course Details Page, this time the course you selected is the course also selected displaying more details below the cards than the others.
5
6
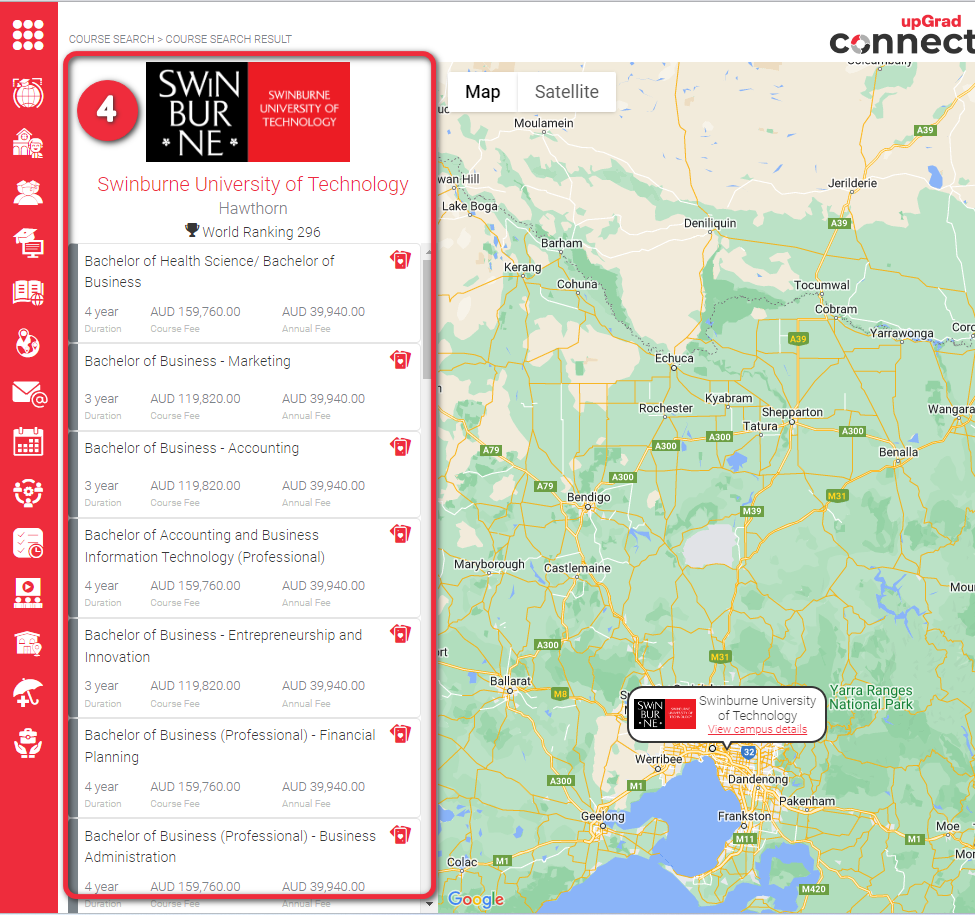
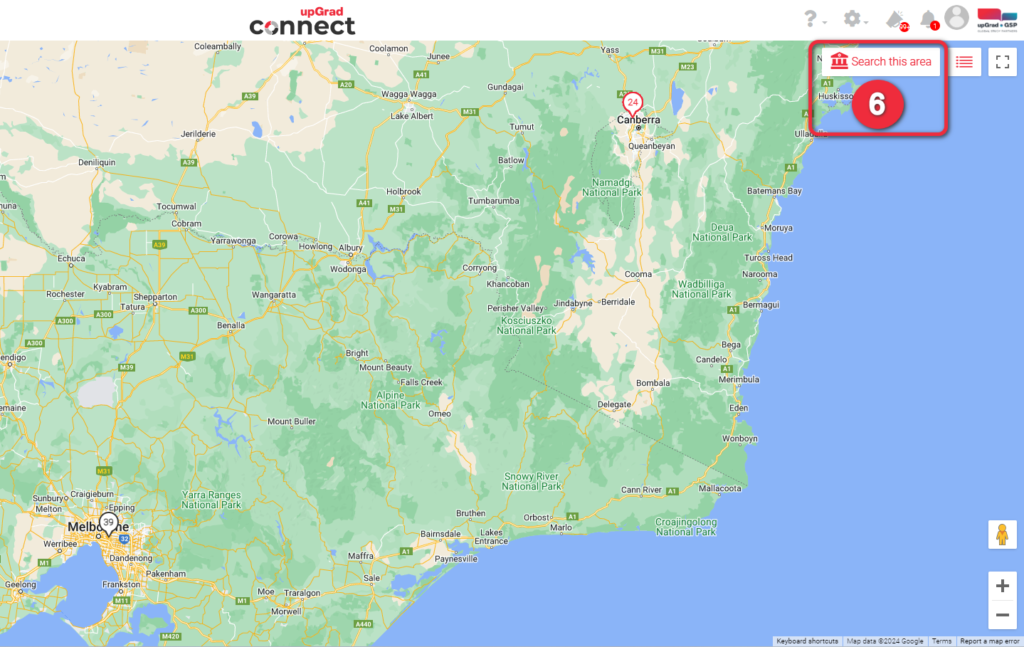
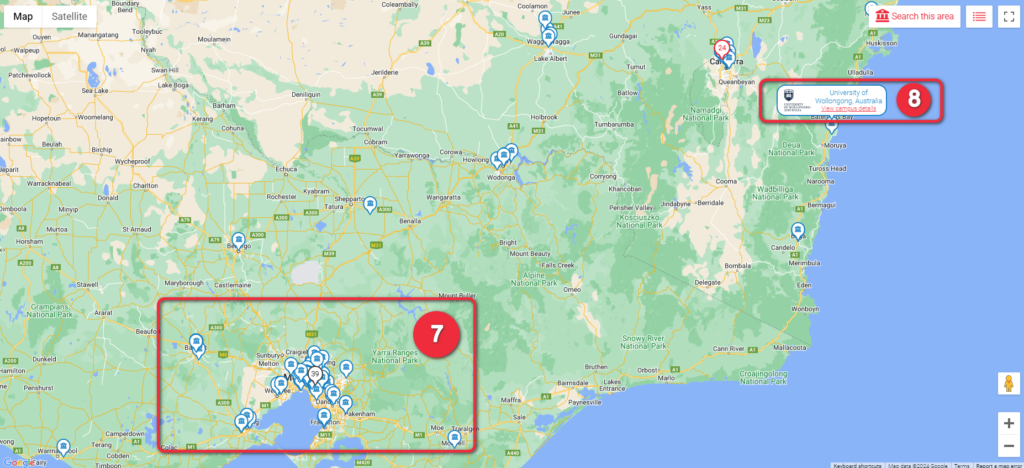
Search this Area. To see all the other campuses in the same area, click ‘Search this area‘
Notice that new blue icons start to appear. These are all the nearby campuses.
7
8
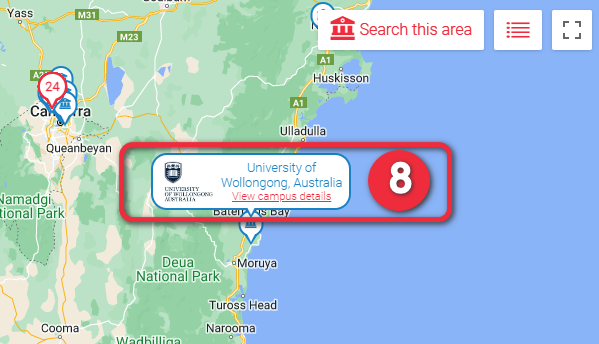
Click any of the campuses that you would to see more details of. Upon clicking, a tooltip will appear to indicate the institution name and a link (View campus details) to learn more about the campus.
Since these campuses are not included in your search results, there will be no courses displayed at the left side.