Lesson 1 – 5
Sessions
Sessions
Learning Objectives
- Find specific enrolment
- Add, view update and delete enrolment records
- Watch to be notified on enrolment updates
- Modify the enrolment list and export a report
In the ‘Homepage Menu’, click ‘My Enrolments’

1
There are 2 types of views available when you want to see the list of enrolments under your School.
- Detail View
- Report View
Detail View – this view displays the most helpful enrolment details. By default, this is your landing view when navigating to My Enrolments Page. Change the view just by clicking the toggle button.
Report View – this view is a simple list view with various columns that you can show and hide. Learn more about Report View

These are the most helpful enrolment related details:
- Enr ID – This is the Enrolment ID. This is unique across the platform, assigned by upGrad App and cannot be edited.
- Full Name – This is the first name and last name of the student who is owns the enrolment record.
- Nationality – This is the country nationality of the student.
- Status – This is the enrolment status. Statuses are dependent to enrolment Stage.
- Institution – This is the institution where the student wants to study.
- RP Branch – This is the branch name or location of your company that the student is under.
- Counsellor – This is one of your company counsellors who is assigned to help students in processing their applications.
- BDM – This is the Business Development Manager. He/She is a upGrad internal main contact personnel for your school.

2
3

This is the Student ID/GSP ID. This number is unique, generated by upGrad and cannot be edited.
This is the visual presentation of the whole process that an enrolment must go through. The Stages are lined up in order. One stage must be done before an enrolment can proceed to the next Stage. The Stages are the following:
- New
- Pre-Screening
- Application
- Offer
- GTE (Genuine Temporary Entrant)
- COE (Confirmation of Enrolment)
- Visa
- Enrolling
- Enrolled
Notice that dots are connected by lines and with different colors. Each line has Stage below. These stages are in order and need to be fulfilled before moving to the next stage. Each color has a representation:
- Red – if the color is Red, means that the stage has been done
- Charcoal – if the color is Charcoal, means that this is the current status of the enrolment

4
5

This is the student profile picture to whom the enrolment is related to. This comes handy to recall easily the face of the student. Click this to go to the Enrolment Record Page.
5.1 The profile picture looks like this if you have not uploaded any for a particular student through the live capture.
The number inside this icon is the total count of all active Applications that a student has across all active enrolments. The first number represents the Primary Application and the 2nd represents the Additional Applications. Thus, in the example on the right, there is only 1 Primary Application and 4 Additional Applications.
Learn how to Manage Applications

6
7
Shows the count of Enrolments on the most important stages:
In Process
COE
Commenced
Not Proceeding
The image below tells us that there are:
68 Enrolments that are In Process
235 Enrolments that are in CoE
218 Enrolments that have Commenced
326 Enrolments that are Not Proceeding
By default, In Process is displayed in the table. You can change this by clicking other stages. In the image below, In Process (red) and Commenced (grey) are coloured. Thus, the table displays Enrolments that are In Process and Commenced only. Hold Ctrl or Cmd on your keyboard to select multiple stages.

Enrolments are grouped based on their Enrolment Statuses to be counted on the 4 Stages mentioned above:
In Process
Application Lodged
Application Submitted
Appointment Set
Approved
COE Issued
Deferred
Deposit Paid
In Progress
Incomplete
Interview
Offer Accepted – Domestic
Offer Issued – Conditional
Offer Issued – Unconditional
Tuition Fee Paid
Visa Appointment – Refile
Visa Submitted
COE
Appointment Set
COE Issued
College Terminated
Completed
Early Withdrawn
Enrolled
Leave of Absence
No Show
Offer Accepted – Domestic
Visa Granted
Visa Refused
Visa Submitted
Commenced
College Terminated
Completed
Enrolled
Leave of Absence
Not Proceeding
Declined
Early Withdrawn
No Show
Visa Refused
WIthdrawn
1

Keyword Search is used to search for an Enrolment by typing Enrolment detail in the Keyword Search textfield. You can search any of the following Student details:
- Student ID/ GSP ID
- Enrolment ID
- Student Full Name
- Institution ID
- Student Date of Birth
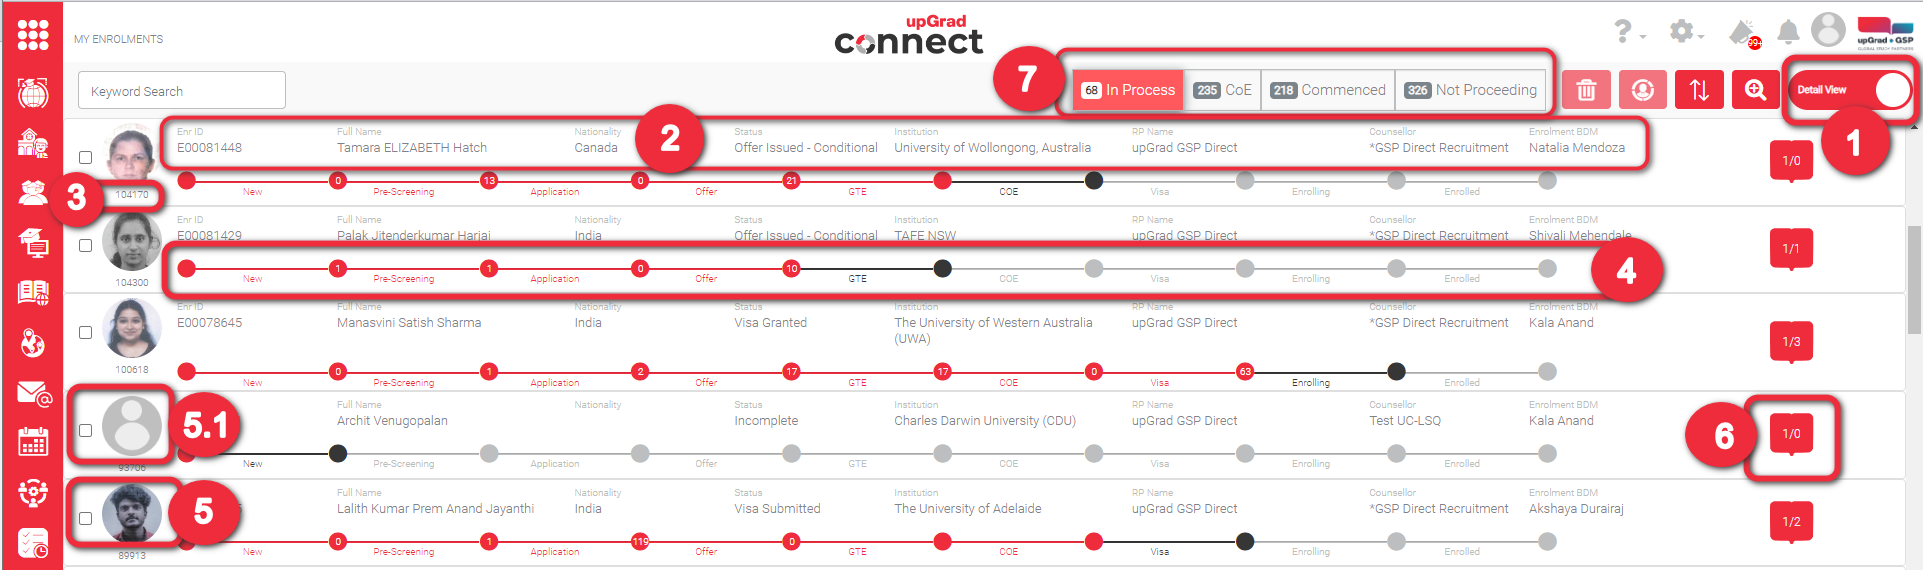
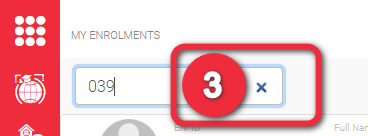
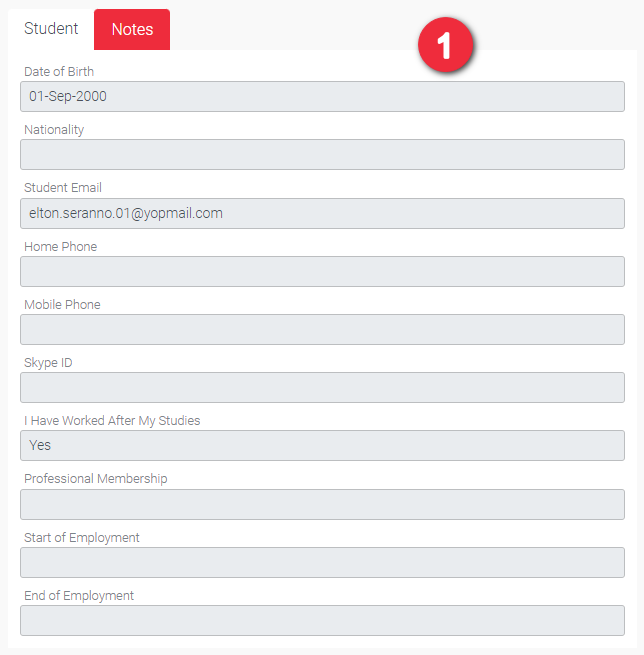
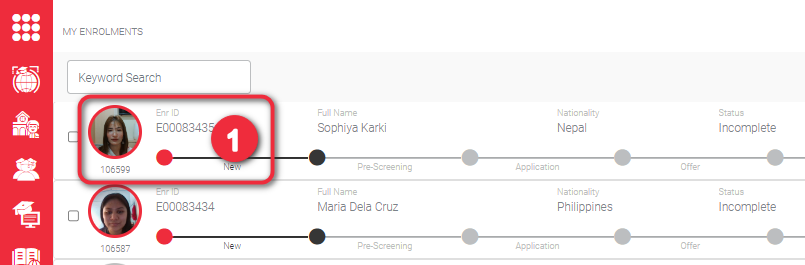
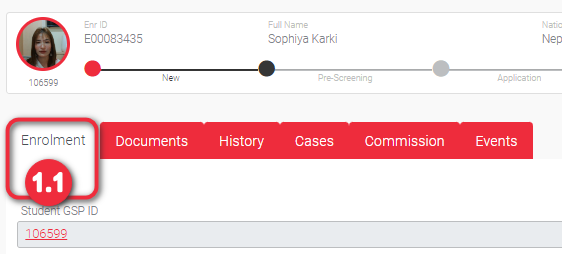
There is a special format when searching for ‘Date of Birth. The format you should use is yyyy-mm-dd (e.g., 1987-09-21). Any part of the student details above are searchable. Keyword Search works the same way for both ‘Detail View’ and ‘Report View’.
2
Example 1: You are looking for an Enrolment with Enr ID ‘E00039940’. When you type ‘039’, the function will search any part of the details bulleted in #1 and will display the following possible results:
- E00033940
- E00039690
- E00039685
- E00039682
- E00039524
- E00039521

Example 2: You are looking for a Student whose birth year is ‘1980’. When you type 1980, and it so happen that there is a Student whose GSP ID is ‘198023’ and there is another student whose full name is ‘Ariel1980 Disney’. Then, the table will filter and display the following possible results:
- Students whose GSP ID has 1980 in it (e.g., 19801, 19802)
- Students whose full name has 1980 in it (e.g., Ariel1980 Disney)
- Students whose birth year is 1980 (e.g., 09-Jun-1980)

This is the student profile picture to whom the enrolment is related to. This comes handy to recall easily the face of the student. Click this to go to the Enrolment Record Page.
3
1

Advanced Search is used to search for an Enrolment by typing Enrolment details. The difference with Keyword Search is that you can identify what specific fields you want upGrad App to search in. Click the magnifying glass icon with ‘+’ to show the pop-up screen of Enrolment details you can search for.
In advanced Search, you can search the following Enrolment details simultaneously:
- Commencement Date (From and To)
- CoE Issued Date (From and To)
- Visa Outcome Date (From and To)
- Create Date (From and To)
- Application Received On (From and To)
- Offer Issued On (From and To)
- Stage
- Status
- Institution Country
- Institution Partner
- Institution
- Master Partner
- Recruitment Partner
- RP Branch
- Enrolment BDM
- Nationality
- Application Current Country
- Application Region
- Create By Type
- Onshore/Offshore
- International/Domestic
- Active/Inactive
You can just fill-out the fields you need. You don’t have to fill-out all the fields. This is also useful in case you do not remember all the details you are searching for since there is a search list function per field based on your keyword input.
Example: Below is a Counsellor searching for an Enrolment of which:
- Commencement Date is ‘2022’
- CoE Issued Date on the 4th Quarter of the current year
- Current Stage is ‘Offer’
- Current Status (as selected)
- Nationality is India
- Enrolment is active (because the tickbox is checked)
By default, the tickbox for ‘Active’ field is checked which means it is searching for active enrolments only. Click the tickbox to uncheck if you want to search for inactive enrolment records.

2.1 When it comes to Dates, you can change the criteria by clicking it to display other options.

2
3

Click ‘Clear’ to remove all your inputs at the same time.

Click ‘Apply’ when you are satisfied with your inputs/criteria of your search
4
5

Click ‘Cancel’ when you do not want to apply the changes you filled-out. Then, the Advanced Search will be closed.

Sort the table by ascending or descending order.
- Ascending is from the earliest date to the latest date
- Descending is from the latest date to the earliest date
- Ascending is from A to Z, 0 to 9
- Descending is from Z to A, 9 to 0
Click the 2-opposite arrows icon and a pop will appear.
1
2
Determine which field you want to sort and and the type of sorting you need. The following are the fields you can sort:
- Enr ID
- GSP ID
- Full Name
- Nationality
- Stage
- Status
- Institution
- Course Application
- Cases
- Commencement Year
- Commencement Month
- Agency
- Counsellor
- Enrolment BDM
- Application Received On
When you sort ‘Application Received On’ in ascending order, this means you are sorting from the oldest to the latest application received date.
When you sort ‘Stage’ in descending order, this means you are sorting in alphabetical order, Z – A.
When you sort ‘Status’ in ascending order, this means you are sorting in alphabetical order, A – Z.
If there are details that are the same like ‘Offer’ or ‘Withdrawn’ then the first to be displayed will be based the record which was created first.

Example:
Given that the following are the student data in the database:
Enr ID
E00000234
E00000145
E00003452
Stage
Offer
Offer
Application
Status
Incomplete
In Progress
Incomplete
Created On
09 – Jan – 2018
10 – Jan – 2019
11 – Feb – 2017
Example 1: You want to sort enrolments’ Stage by ascending order. The Enrolments list will be arranged in the following order:
Enr ID
E00003452
E00000234
E00000145
Stage
Application
Offer
Offer
Status
Incomplete
Incomplete
In Progress
Created On
11 – Feb – 2017
09 – Jan – 2018
10 – Jan – 2019
Example 2: You want to sort enrolments’ Status by descending order. The Enrolments list will be arranged in the following order:
Enr ID
E00000234
E00003452
E00000145
Stage
Offer
Application
Offer
Status
Incomplete
Incomplete
In Progress
Created On
09 – Jan – 2018
11 – Feb – 2017
10 – Jan – 2019
Click ‘Apply Sort’ button if you are satisfied with your selections

3
4

Click ‘Cancel’ button if you do not want to apply the sort. The sort pop will then be closed.

This is about assigning a counsellor to a particular enrolment. Note that this is different from assigning a counsellor to a student. By default, the assigned counsellor of an enrolment is based on the assigned counsellor of the student. However, the assigned counsellor of an enrolment can be changed and it is independent from student’s assigned counsellor. This means, student assigned counsellor do not follow the enrolment’s updated assigned counsellor.
All enrolments have their assigned counsellors. It is important that all enrolments have their assigned counsellors to make sure that all are making progress probably because of the absence of student’s assigned counsellor. This is visible to all users, so it is easy to know especially for Head Office or Branch Officers who to contact for different reasons.
Only the Head Office and Branch Officers can access this function.
1


You should select at least one Enrolment to enable the Assign Counsellor icon. Left images show how enabled and disabled Assign Counsellor icons look like.

To change the assigned Counsellor of an Enrolment:
1.1 Select the student(s) you want to change Counsellor by checking the tickbox beside the profile picture. You can select multiple students. You should select at least one student to enable the Assign Counsellor icon button.
2

Click the Assign Counsellor icon button.

Select the new counsellor in the dropdown list. The counsellor list should only consist of the counsellors within your Company/Institution.
3
4

Click ‘Assign’ button when you are satisfied with the newly selected Counsellor.

4.1 This shall be displayed when the assigning of Counsellor was successful. Click OK to remove this

Click ‘Cancel’ button when you do not want to change the Counsellor.
5

Deleted Enrolment Record
Delete function is important especially when you have duplicate enrolment records. You can only delete enrolment records only when the Stage is ‘New’.
1


You should select at least one Enrolment to enable the Delete Icon. Right images show how enabled and disabled Delete icons look like.

First, select the enrolment you want to delete by checking the tickbox beside the profile picture. You can select multiple enrolments. You should select at least one enrolment to enable the Delete icon.

Click the ‘Delete’ icon button to display the delete confirmation pop-up.
2
3

Click ‘Delete’ button to confirm the enrolment(s) you are about to delete.

Click ‘Delete’ button to confirm the enrolment(s) you are about to delete.
4

4.1 This will appear if deleting of the Enrolment(s) has been successful. Click OK to remove this pop.

4.2 You can only delete enrolment records only when the Stage is ‘New’. Please ask for Admin’s assistance in case you need to use this function. Click OK to remove this pop.
1
The details that you will find in Enrolment Overview (at the top the the Enrolment Detail View tab) are the same details that you will find in the Detail View (previous lesson). However, here when you click the student profile picture, it will navigate you to Student Record Page. Learn more about Enrolment Detail View.


The Enrolment details that you will find here are the following:
- Student ID/ GSP ID
- Student First Name
- Student Last Name
- Institution Name
- Institution ID
- Campus
- Onshore/ Offshore
- Int’l/ Domestic
- Travelling Preference
- Application Current Country
- Recruitment Partner
- RP Branch
- Counsellor
- Enrolment BDM
- GTE Outcome
- Visa Outcome
- Enrolment ID
- Enrolment Type
- Commencement Year
- Commencement Month
- Commencement Date
- Enrolment Stage
- Enrolment Status
- Status Reason
- Application Received Date
- Pre-Screen Approved Date
- Application Lodged Date
- Letter of Offer Issued Date
- GTE Outcome Date
- COE Issued Date
- Visa Lodgement Date
- Visa Outcome Date
Notice that the Student GSP ID is a link. You can click this to go the Student Record Page.

1
2
Academic Background
Click the label ‘ACADEMIC BACKGROUND’ or any part of the label’s row to expand or collapse this section and view the details.
- Level of Education
- Year Completed
- English Proficiency Type
- English Proficiency Description
- English Certified Date
- Language Overall Score
- Reading Score
- Listening Score
- Writing Score
- Speaking Score

Click the label ‘SYSTEM INFORMATION’ or any part of the label’s row to expand or collapse this section and view the details. All the fields here are system generated. Therefore, you cannot edit any of the fields here. These are the following:
- Created By – User who created the enrolment record
- Created On – When was the enrolment record created
- Last Modified By – User who made the latest changes to any of the enrolment details (Details above System Information)
- Last Modified On – When were the last changes made
- Last Status Updated – Date the status was last updated
- Active – checked if the enrolment record you are viewing is active. This is unchecked if the enrolment record is inactive.

3
Delete function is important especially when you have duplicate records. Click the trashcan icon above the enrolment record. As a Counsellor, you can only delete an enrolment record when the Stage is ‘New’. You may ask for your BDM’s Assistance should you need this function.

1
2

Then, confirm the action by clicking ‘Delete’ button in the pop

Click ‘Cancel’ if you do not want to delete the student record anymore.
3
1

You can view some of the student details who owns the enrolment on the right hand side of the screen. This is just a view, you cannot edit student details here. Below is a list of all the student details that you can view here:
- Date of Birth
- Nationality
- Student Email
- Home Phone
- Mobile Phone
- Skype ID
- I have worked after my studies
- Professional Membership
- Start of Employment
- End of Employment
1

When you set a record page to “Watching”, you will receive notification whenever updates are made into the record by:
- Notification in the header (bell icon)
- Via email according to your set up in the Email Settings page in My Profile
Click Watch (binoculars icon) to see who else are watching this record and if you want to change the setting from “Watching” to “Not Watched”
When Watch is colored, it means you are currently watching updates in the record already.

Clicking Watch will display:
- list of people watching the same record
- action button where you can change watch settings, either you want to watch it or stop watching
- you can add your team members not included to watch this record
In the image below clicking “Stop watching this record” will turn the watch icon into grey color. This means you will no longer receive any notifications when an update has made to this record.
2
1

Go to the enrolment record page by clicking the student’s profile picture in the enrolment list.

At this point, you are in a view page of enrolment record. You cannot edit any as also visualised by the grey background of text fields. Click the edit icon button to make this view editable. Note that you can only edit enrolment details when the Stage is New. If enrolment stage had passed New, please ask for your Admin’s assistance should you have any updates.
2
3

Now that the record page is in edit mode, you can edit enrolment details that have white background. You cannot edit fields with grey background, the following:
- Student First Name and Last Name – you need to navigate to My Students to change the student details from there. Click the Student GSP ID link to go to Student Details Page.
- Enrolment ID – this is generated and assigned by the GSP App. You cannot change this.
To make sure that the enrolment is properly handled, make sure that the following details are correctly filled out:
- Agency – Agency Location that the enrolment should be handled from
- Counsellor – Counsellor/ Agent who should handle this enrolment. By default, this is the Student’s Counsellor, however you can change still change this.
- GSP BDM – This is usually the Business Development Manager assigned to your Agency.
In the Enrolment Edit Page, you will find additional fields:
- Commencement Date – Identify here the specific date that this enrolment will start
- Enrolment Stage – Upon creation of enrolment record, the enrolment stage is by default ‘New’. You should submit the enrolment to change to the next enrolment stage. Learn how to submit application
- Enrolment Status – By default, the enrolment status is Incomplete. As per Stage is New, you can only select for two enrolment status, ‘Incomplete’ or ‘Withdrawn’.
- Status Reason – Select the most appropriate status reason
All other fields that you find in page are to be updated by your BDM. Make sure to keep the BDM assigned to you updated on the progress.

You can also update the Academic Background.
4
5

If you are happy with the input details, click Update button.

5.1 You will be immediately notified that the enrolment record has been successfully updated. Click ‘OK’ button to remove this. You will then be redirected to the enrolment record page you just updated.

Click ‘Cancel’ button if you do not want to save your changes. After clicking ‘Cancel’ button, the page will again turn into View mode wherein you cannot edit any detail.
6
1

All Enrolments should be submitted for processing. Just making a record and completing the details will not move the Enrolment to the next stages. To submit an Enrolment, click the Submit Application button. You can only submit this when an Application is linked in this Enrolment Record that can be seen below the record, Application List. Otherwise this will fail.

Image 1.1 A confirmation message pop-up should be displayed if the submission of the Enrolment was successful. This means that the Enrolment Stage and Status has been updated. Click the ‘OK’ button to remove the pop-up display.

Image 1.2 Make sure that there is at least one Application linked to the Enrolment to submit it successfully. Otherwise, an error message will be displayed upon clicking the ‘Submit Application’.
1

There are 2 types of views available when you want to see the list of students under your Company or Agency:
- Report View
- Detail View
Report View – There are functions in this view that are not found in the Detailed View. Report View is just a simple list of enrolments with their details in a column format. Change the view just by clicking the toggle button.
Detail View – this view displays the most helpful report details. By default, this is your landing view when navigating to My Enrolments Page. Learn more about Detail View

This function acts like a keyword search wherein it searches the list but on a columnar basis. It also acts like an advanced search because you can search columns simultaneously. This function can be found together with the other function icons at the top left of the Enrolment List. Click this button to search by column.
1
2

After clicking the Filter Column icon button, textboxes below the field columns will be displayed, some of which are disabled by being greyed out. These are disabled because they are the fields that are already found in the Advanced Search. Having them in two functions may cause confusion to users on the search results, so it’s better to disable these fields here.
Textboxes that appeared behave the same way as the Keyword Search. However, the Commencement Month is an exception in terms of input. Months have equivalents numbers which you will use to search. 1-12 represent Jan – Dec (e.g., 1 is Jan, 2 is Feb, 3 is Mar, and so on). Take into consideration too that it searches the parts of the month number.
Example
You want to search for enrolments that will commence on January. You need to type ‘1’ in the text box. The search results would then be month numbers with ‘1’. Those months are January (1), October (10), November (11) and December (12). You can just use the sort function to make all January line up.

The simultaneous search is helpful especially when you can’t remember all the details of a column/ field. Let’s say you can only remember a part of the Enrolment ID. You can type an incomplete Enrolment ID and the list will filter all GSP ID with what you typed, let’s say ‘373‘. So, the list will display those enrolments with Enrolment ID that has ‘373’ in it. Just like in the image below, the enrolment with Enrolment ID’s E00083738, E00083731, E00083373, E00082373 etc are the search results. The list will be automatically filtered after typing a keyword.
This is also very useful when you cannot remember the full name of student.
3
4

You can further refine the search results by typing keyword in any of the enabled fields, for instance typing ‘Phi’ in Nationality. As you observed, the search results is refined.
By default, the displayed columns are the following:
- Enrolment ID
- GSP ID
- Full Name
- Nationality
- Application Current Country
- Stage
- Status
- Primary #
- Additional #
- Institution
- Commencement Year
- Commencement Month
- Agency
- Counsellor
- Enrolment BDM
However, if you want to see more details in this view you can do so by clicking the Show/ Hide Columns icon button.

1
2

When you click the Show/ Hide Columns icon button, a list of available fields with checkboxes is displayed. Checkboxes that are ticked means that they are already displayed in the Report View. Thus, by default the fields itemised in #1 are checked here.

Check the tick box of the field that you want to display.
3.1 Upon ticking the checkbox, the field will be immediately displayed in the enrolment list.
3
1

The list is by default sorted from the latest created student record to the earliest. Sorting is only one field at a time. If you sort one field, then all the records related to it (the whole row) will follow. And if you try to sort another field, the previous field will be lost.
Click the up and down arrow on the left of each field/ column names if you want to sort a specific field.

At your first click, it will sort the column in ascending order (from earliest to latest ). Ascending order is any of the following:
- from the earliest date to the latest date
- from A to Z
- from 0 to 9
The arrow will be changed into an upward arrow and of a blue color.
2
3

Click the upward arrow again to sort the column in descending order (from latest to earliest). Descending order is any of the following:
- from the latest date to the earliest date
- from Z to A
- from 9 to 0
The arrow will be changed into a downward arrow and still a blue color.
You can download the enrolment records in case you need to do some reports. By default, whatever is displayed upon going to this page will be included in the downloaded report.
You can download specific records by using the search functions, namely:
Advanced Search
keyword Search
Filter Columns
The downloaded report will be in csv format. This format is a spreadsheet where you can create your report or copy paste in your preferred spreadsheet (e.g., Google Sheets, MS Excel)
Click the CSV icon button to download the report. If you did not use any search function, the downloaded report will include all the active student records by default

1
2
A report will be immediately downloaded upon clicking the CSV report icon. You can either find it below your browser’s window (2) and/ or in any of your folders (2.1).


Open the file to view the details. The number of enrolment records here should be the same as the number of records in the Report View. The first row is the same as the column name in Report View and the details follow.
3
1
Applications linked to enrolments can be found below the enrolment record. You just have to scroll below the enrolment record.

1 Click the student’s profile picture in the Manage Enrolments Page.

1.1 Make sure you are in Enrolment tab. Scroll down up to the b ottom of the page until you see Applications List.
1.2 Applications List. Applications that have related process in Studylink will have the logo Studylink as displayed in the second Application in the list below.


Check the tickbox of the field that you want to display.
3.1 Upon ticking the checkbox, the field will be immediately displayed in the enrolment list.
2
1

In the Applications List, select an application to be deleted by checking the tickbox beside the App ID (left most tickbox). Selecting an application should enable the trashbin above the applications list.
Click the enabled trashbin, ‘Delete’ icon button, to delete the selected application

2
3

Click ‘Delete’ button in the confirmation pop-up.

3.1 A pop-up will be displayed to confirm that you have successfully deleted the selected application(s).

Click ‘Cancel’ button if you do not want to continue deleting the selected application(s).
4