Manage Student

Lesson 1 – 5

Learning Objectives

  • Find specific student
  • Add, view update and delete student records
  • Watch to be notified on student updates
  • Modify the student list and export a report

In the ‘Homepage Menu‘ click ‘My Students‘.

There are 2 types of views available when you want to see the list of students related to your Company or Agency or simply students who are under your care:

  • Detail View
  • Report View


Detail View – this view displays what we think are the most helpful student details. By default, this is your landing view when navigating to My Students Page. Change the view just by clicking the toggle button.


Report View – this view is a simple list view with various columns that you can show and hide. Learn more about Report View

1

2

These are what we think are the most helpful student related details:

  • Last Name – this is the last name or surname or family name of the student
  • First Name – this is the first name or given name of the student
  • Agency – this is the branch name or location of your branch that the student is under
  • Nationality – this is the country nationality of the student. e.g., select China if Chinese, select Viet Nam if Vietnamese, select India if Indian, etc.
  • Counsellor – this is one of your company agents who is assigned to help students in processing their applications. This can be any from the Head Office, Branch Office or Counsellor itself.
  • BDM – this the Business Development Manager, a GSP internal main contact personnel assigned to your Company

This is the Student ID. This number is automatically assigned upon student creation and is unique across the upGrad Connect App. You can use this ID in case you want to raise some student related concerns. So, it is easier to identify who you are referring to. Whereas, if you use the first name, there might be instances that students have the same names and may cause confusion as to whom you are referring to.

3

4

This is the student Profile Picture. This comes handy to recall easily the face of the student. To upload the photo of the student click on the Take Live photo button under the photo placeholder after you open the student’s profile. 

4.1 means you have not yet uploaded any profile picture for that student.

Keyword Search is used to search for a student by typing student details in the keyword search text field. You can search any of the following student details:

  • Student ID/ GSP ID
  • Full Name
  • Date of Birth

1

There is a special format when searching for Date of Birth. The format you should use is yyyy-mm-dd (e.g., Use ‘1987-06-21’ if you are searching for June 21, 1987 ). Any part of the student details above are searchable. Keyword Search works the same way for both ‘Detail View’ and ‘Report View’.

2

Example 1: You are looking for a student whose GSP ID is ‘12749’. When you type ‘127’ only, the function will search any part of the Student ID and will display the following possible results only to those you have access:

  • 12799
  • 12795
  • 12782
  • 12795
  • 12762
  • 12755
  • 12749
  • 12741

2.1 This means, any part of the Student ID is searched, filtered and displayed.

Example 2: You are looking for a Student whose birthyear is ‘1980’. When you type 1980, and it so happen that there is a Student whose GSP ID is ‘198023’ and there is another student whose full name is ‘Ariel1980 Disney’. Then, the table will filter and display the following possible results:


  • Students whose GSP ID has 1980 in it (e.g., 19801, 19802)
  • Students whose full name has 1980 in it (e.g., Ariel1980 Disney)
  • Students whose birthyear is 1980 (09-Jun-1980)

To remove the keyword search instead of pressing backspace multiple times, click the cross button at the right of the the text field.

3

1

Advanced Search is used to search for a student by typing student details. This is the magnifying glass icon button with ‘+’ in it. Unlike keyword search, here you can identify what specific field you want GSP App to search in. Click Advanced Search to show the pop-up screen of student details you can search for.

In Advanced Search, you can search the following Student details simultaneously:

  • Created On (From and To)
  • Nationality
  • Counsellor
  • Master Partner
  • Recruitment Partner
  • RP Branch
  • RP BDM
  • Current Country
  • Permanent Country
  • Active / Not Active

You can just fill-out the fields you need. You don’t have to answer all the fields. This is also useful in case you do not remember all the details you are searching for because each field has their own search list function according to your keyword input.

Example 1: Below is a Counsellor searching for students who have the following criteria:

  • record created specifically on 17-Oct-2023
  • Nationality is India 
  • Student’s current country is Philippines
  • Account is active (because the tickbox is checked)


By default, the tick box for ‘Active’ field is checked which means it is searching for students with active accounts. Click the tick box to uncheck and check Not Active if you want to search for inactive student records.

2

3

Click ‘Clear‘ to remove all your inputs at the same time. So, you won’t have to remove field per field. Your inputs in Advanced Search will always remain unless the page is refreshed. To reset the Advanced Search easier, you should click ‘Clear’ button.

Click ‘Apply’ when you are satisfied with your inputs/ criteria of your search. And you will be redirected to students list showing only the search results.

4

5

Click ‘Cancel’ when you do not want to apply the changes you filled-out.

Click any of these rounded arrows if you want to remove your input in a search criteria.

6

1

Sort the table by ascending or descending order.

  • Ascending is A to Z and 0 to 9
  • Descending is Z to A and 9 to 0


Click the 2-opposite arrows button and a pop will appear. There might be instances that the detail in your sort field are the same like 5 of the students are from Nepal. In this case, the criteria used is the Created Date

Determine which field you want to sort and and the type of sorting you need. The following are the fields you can sort:

  • Student ID
  • Full Name
  • DOB
  • Nationality
  • Permanent Country
  • Agency
  • Agency Counsellor
  • BDM

When you sort DOB in ascending order, this means you are sorting from the oldest student to the youngest student by age.

Given that the following are the student data in the database:

Name
Rap Unzel
Rudolph Rednose
Else Arendelle

DOB
23-Dec-1989
14-Jun-2000
02-Apr-1994

GSP ID
43211
32190
56402

Example 1: You want to sort students’ Full Name in ascending order. The students list will be arranged in the following order:

Name
Rap Unzel
Rudolph Rednose
Else Arendelle

DOB
23-Dec-1989
14-Jun-2000
02-Apr-1994

GSP ID
43211
32190
56402

Example 2: You want to sort students’ DOB in descending order. The students list will be arranged in the following order:


Name
Rap Unzel
Rudolph Rednose
Else Arendelle

DOB
23-Dec-1989
14-Jun-2000
02-Apr-1994

GSP ID
43211
32190
56402

Example 3: You want to sort students’ GSP ID in ascending order. The students list will be arranged in the following order:

Name
Rap Unzel
Rudolph Rednose
Else Arendelle

DOB
23-Dec-1989
14-Jun-2000
02-Apr-1994

GSP ID
43211
32190
56402

2

Click ‘Apply Sort’ button if you are satisfied with your selections. The pop-up sort will then be removed and expect the student list to be sorted accordingly.

3

4

Click ‘Cancel’ button if you do not want to apply the sort.

1

All students have their assigned Counsellors. It is important that all students have their assigned Counsellors to make sure that all are making progress in their applications. This is visible to all users, so it is easy to know especially for Head Office / Branch officers who to contact for different reasons like any student related concerns.

This function is very handy for various reasons especially when the assigned Counsellor is no longer working in the Company or changed branch office. Then, the assigned Counsellor should be changed to make sure of the continuous processing of student application.

Who can do this?
Users with admin or standard permission roles can do this. If you are counsellor, you cannot access this feature.  Please speak to your superior at your institution. 

When can you do this?
You can only transfer a Student to a different Counsellor of the same institution or Office regardless of your permission role. You can only transfer multiple students at the same time to the same Counsellor only if their current Counsellors are of the same institution.

Enabled Icon
Disabled Icon (lightly colored)

1.1 You should select at least one Student to enable the Assign Counsellor icon. Left images show how enabled and disabled Assign Counsellor icons look like.

To change the assigned Counsellor of a student:

Select the student(s) you want to change Counsellor by checking the tickbox beside the profile picture. You can select multiple students. You should select at least one student to enable the Assign Counsellor icon button.

If you want to select multiple students and change their Counsellors at the same time, please make sure that the Counsellors of the selected students are of the same institution.

2

Click the Assign Counsellor icon button.

Select the new Counsellor in the dropdown list.

3

4

Click ‘Assign’ button when you are satisfied with the newly selected Counsellor.

Click ‘Cancel’ button when you do not want to change the Counsellor.

5

6

Make sure to select students whose Counsellors of the same branch (location). If you select students with different counsellor branches a warning message will pop. Click ‘Cancel’ to remove the pop message.

A notification message will appear when you have successfully changed the Counsellor.

7

1

Delete function is important especially when you have duplicate records.

Who can do this?
Users with different permission roles have different type of access. 

  • Head Office Standard
    • You can view all students within the Institution only if you are linked to the Main Branch. Thus, you can delete any Student from any Branch.
    • You can only view Students within the Branch, if you are NOT linked to Main Branch (different Branch). Thus, you can only delete Students within your Branch
  • Counsellor. You can only delete Students who are directly assigned to you as their Counsellor.


When can you do this?
You can only delete Student(s) when Student(s) has no active Enrolment or Application linked to them. “Active” means that only when Enrolment or Application (previously active) has been removed only then you can delete Student(s)

Enabled Icon
Disabled Icon (lightly colored)

You should select at least one student to enable the Delete icon. Right images show how enabled and disabled Delete icons look like.

First, select the student(s) you want to delete by checking the tickbox beside the profile picture. You can select multiple students. You should select at least one student to enable the Delete icon button.

Click the ‘Delete’ icon button to display the delete confirmation pop-up.

2

3

Click ‘Delete’ button to confirm the student(s) you are about to delete.

Click ‘Cancel’ button when you do not want to proceed on deleting the student record(s). 

4

5

This will appear if there is at least one active (not deleted) Enrolment or Application linked to the Student.

1

Lorem ipsum dolor sit amet, consectetur adipiscing elit. Ut elit tellus, luctus nec ullamcorper mattis, pulvinar dapibus leo.

  • Student Profile Picture
  • Student GSP ID/ Student ID
  • Gender
  • Email
  • Home Phone
  • Mobile Phone
  • Skype ID
  • Student Last Name
  • Student First Name
  • Recruitment Partner
  • RP Branch
  • Counsellor
  • BOD

Click the label ‘PASSPORT DETAILS’ or any part of the label’s row to expand or collapse this section and view the details. Mosty likely all the fields here can be found in the student’s passport, so it should be easy to fill this out when you have the passport. Here you will find the following passport details:

  • Passport Number
  • Place of Issue
  • Nationality
  • Date of Issue
  • Date of Expiry
  • Place of Birth
  • Previous visa decision

2

3

Click the label ‘STUDENT ADDRESS’ or any part of the label’s row to expand or collapse this section and view the details. ‘Current Address’ is where the student lives as of the moment like if he/she is working on a different country or city and goes home (‘Permanent Address’) every twice or thrice a year. These two addresses can be the same or different depending on the living situation of the student. if they are same, you can simply click on ‘Same as current’ next to the Permanent Address heading. They also have the same fields:

  • Street 1
  • Street 2
  • City
  • State
  • Postcode
  • Country

Click the label ‘WORK EXPERIENCE DETAILS’ or any part of the label’s row to expand or collapse this section and view the details. Here you will find the following details:

  • I have worked after my studies
  • Start of Employment
  • End of Employment
  • Professional Membership
  • Employer
  • Manager

Leave “End of Employment” field blank, if Student is still working in the stated employer. We can accommodate one work experience for now, so the details you input/ find here should be the latest.

4

5

Click the label ‘SYSTEM INFORMATION’ or any part of the label’s row to expand or collapse this section and view the details. All the fields here are system generated. Therefore, you cannot edit any of the fields here. These are the following:

  • (User) Record ID – The ID of the user who created the student record
  • Created By – the complete name of the user who created the student record
  • Last Modified By – the complete name of the user who made changes to any of the student details (Details above System Information)
  • Active – Tickbox is checked if the student record is active. If tickbox is unchecked, means student record is inactive/ deleted.
  • Permission Role – the permission role of the user who created the student record
  • Created On – the date and time (viewer’s local time) when the student record was created
  • Last Modified On – the date and time (viewer’s local time) when the last update or change was made

Delete function is important especially when you have duplicate records. Click the trashcan icon above the student record.

Who can do this?
Users with Permission Roles:

  • Head Office Standard
    • You can view all student records within the Institution only if you are linked to the Main Branch . Thus, you can delete any Student from any Branch.
    • You can only view student records within the Branch as yours if you are NOT linked to Main Branch Office (different Branch). Thus, you can only delete Student that is within your Branch.
  • Branch Standard. You can only view student records within your Branch. Thus, you can only delete Students within your Branch. Case is the same for Head Office Standard that is not linked to the Main Branch Office.
  • Counsellor. You can only delete Students who are directly assigned to you as their Counsellor.


When can you do this?

You can only delete Student from here when Student has no active Enrolment(s) or Application(s) linked to them. “Active” means that only when Enrolment or Application (previously active) has been removed only then you can delete a student record.

1

2

Then, confirm the action by clicking ‘Delete’ button in the pop.

2.1 A pop-up will be displayed to confirm that the student record has been deleted. This will be removed by itself after 5 seconds.

Click ‘Cancel’ if you do not want to delete the student record anymore.

3

4

4 This will appear if there is at least one active (not deleted) Enrolment or Application linked to the Student.

1

You can view all the Enrolments that a student has in the ‘Enrolment’ tab. This is located on the right side of the screen. Each block is equivalent to one Enrolment. The image below shows that this student has 1 Enrolment. If you don’t see any block here, it means that there is no enrolment created yet for this student.

The latest created enrolment is displayed at the top. Click the Enrolment ID link to navigate to its Enrolment Details.

Courses included in the enrolment are also displayed at the bottom part of the enrolment block. Below is a list of all the details in an enrolment block which you may find helpful:

  • Enrolment ID
  • Institution
  • Campus
  • Type
  • Stage
  • Status
  • Course(s) in the enrolment

Add an enrolment for a student by clicking the ‘+’ sign in the Enrolment tab.

2

1

When you set a record page to “Watching”, you will receive notification whenever updates are made into the record by:

  • Notification in the header (bell icon)
  • Via email according to your set up in the Email Settings page in My Profile

Click Watch (binoculars icon) to see who else are watching this record and if you want to change the setting from “Watching” to “Not Watched”

When Watch is colored (red), it means you are currently watching updates in the record already.

Clicking Watch will display:

  • list of people watching the same record
  • action button where you can change watch settings, either you want to watch it or stop watching


In the image below clicking “Stop watching this record” will turn the watch icon into grey color. This means you will no longer receive any notifications when an update has made to this record.

2

1

Click ‘+’  action button found at the top left of the student list.

A pop-up form should appear for you to fill out. Fields that you see with red asterisk (*) are required fields. The first part is ‘Personal Details’.

First Name – This is also sometimes called ‘Given Name’ of the student. You can type any text in this textfield and it has no maximum character input. It is a required field. You should also put the name extension, if any, like Jr. or III (e.g., Raymond Morgan, Jr.)

Last Name – This is also sometimes called ‘Family Name’ or ‘Surname’ of the student. You can type any text in this textfield and it has no maximum character input. It is a required field.

2

3

Email – This is the email address of the student. You should put here the most active email of the student to make sure that the student receives any update from you. You should only input email address with valid format. Valid formats need to have a prefix before the @ sign and the domain after the @ sign. e.g., anastasia.romanova@yopmail.com. This is a required field.

These are the Recruitment Partner details that you should fill out to make sure that there is someone who will handle all the processing needs of the student. All of these fields are picklists and are required.

4

4.1 Click Recruitment Partner field to display the picklist. This should only show the Recruitment Partner where you (as the logged in user) belongs to. Click one in the picklist to fill out this field.

4.2 Click RP Branch field to display the picklist. This should only show the active Branches of your company that you registered in GSP App. Click the Branch to which the student will be under. For this instance it is ‘London Office’.

The picklist depends on your Permission Role. These are the following Permission Roles:

Head Office Standard – picklist will show all the active and registered branches in GSP App under your Company
Branch Standard – picklist will only show the active and registered Branch where you are under
Counsellor – picklist will show only the active and registered Branch where you are under

4.3 Click Counsellor field to display the picklist. This should only show the active and registered counsellors of the selected RP Branch. Click the Counsellor to whom the student will be under. For this instance, David UC is the selected Counsellor.

The picklist depends on your Permission Role. These are the following Permission Roles:

Location Agent – picklist will show all the Counsellors active and registered in upGrad Connect App under the selected Agency.
Counsellor – picklist will show only your name.

5

Gender – You only have two choices here, ‘Male’ and ‘Female’. Click the circle (radio button) beside the gender that you want to select to mark it.

DOB – This is the student’s Date of Birth. You need to select the year, month and date of the birthdate one by one to fill this out properly and to make sure that the format is correct. This is a required field.

6

6.1 When you click this field, it will display a date picker. At first it will show the current month-year calendar.

6.2 Click the month-year above the calendar twice (in the image it is ‘Mar 2022’)

6.3 Click the month-year above the calendar twice (in the image it is ‘Mar 2022’)

6.4 Click the month-year above the calendar twice (in the image it is ‘Mar 2022’)

6.5 Click the month-year above the calendar twice (in the image it is ‘Mar 2022’)

7

Other helpful contact details of the student should also be filled out in the form if student has any of them. Thus, these are not required fields. It is very important to fill out the phone fields with all the location codes so you can easily contact the student in case you are in a different country.

Home Phone – Sometimes this is called Landline Number. Its format should be the country code + area code + subscriber number

Mobile Phone – This should be the same format as the Home Phone, that is country code + area code + subscriber number

Skype ID – it will  also be helpful if student has this contact detail. This is a free format text field which means it has no validations and no maximum character input.

Marital Status is another piece of information to be fed into the student’s details. Select ‘Married’ or ‘Single’ as deemed fit.  

8

1

All the details that you need to input in the Passport Details can be found in the student’s passport. All of these are not required fields when you create a student. So, you don’t have to input these details at this point. The following details are all free text field, no validation and no maximum character input:

  • Passport Number
  • Place of Issue
  • Date of Issue
  • Date of Enxpiry
  • Place of Birth

You can use #6 in Session 1 as a guideline to fill out the date fields here.

As per ‘Nationality’ you have to select the country from a picklist of alphabetically organised countries (e.g., if Indian select India, if Filipino select Philippines, if Nepalese select Nepal, etc.)

2

2.1 As per ‘Nationality’ you have to select the country from a picklist of alphabetically organised countries (e.g., if Indian select India, if Filipino select Philippines, if Nepalese select Nepal, etc.)

3

You can also mention if your student has any previous visa rejections. If the student does not have, select ‘NO’.

If the student has faced any visa refusal in the past, select ‘YES’ and write the details about it in the description section.

1

There are two kinds of student addresses, the current address and the permanent address. These fields are all free text fields, with no validations and no maximum character limit. These are not also required. 

Current Address – this is the address where the student currently stays. He/ She might be living in a different place to work, to study or for any various reasons. You can almost say that this is where he/she goes home most of the time for a possible period of time. If student has only one address (permanent address), current address should also filled out.

Permanent Address – if student has only one address, then that is considered as his/her Permanent Address and Current Address. You have to fill out the Current Address as well with the same details in the Permanent Address. You can tick on the ‘Same as Current’ checkbox next to Permanent Address title. This is the address indicated in student proof of ID like passport or driver’s license

1

As of now we can only record one work experience. If the student has been to more than one position title or employer, input the latest or the current. You do not have to fill out these fields at this point. Thus, these are not required fields. But if you already have them, might as well input them. You can use #6 in Session 1 to fill out the Date fields here. Others are free text field, no validation and no maximum character input. The following are the Work Experience Details fields you can input:

I have worked after my studies – Click the circle beside your answer, ‘Yes’ or ‘No’. There is no need to fill out the other details if your answer is ‘No’. Fill out the other details if your answer is ‘Yes’. It is fine to leave the other details blank for now if you don’t have them at hand.

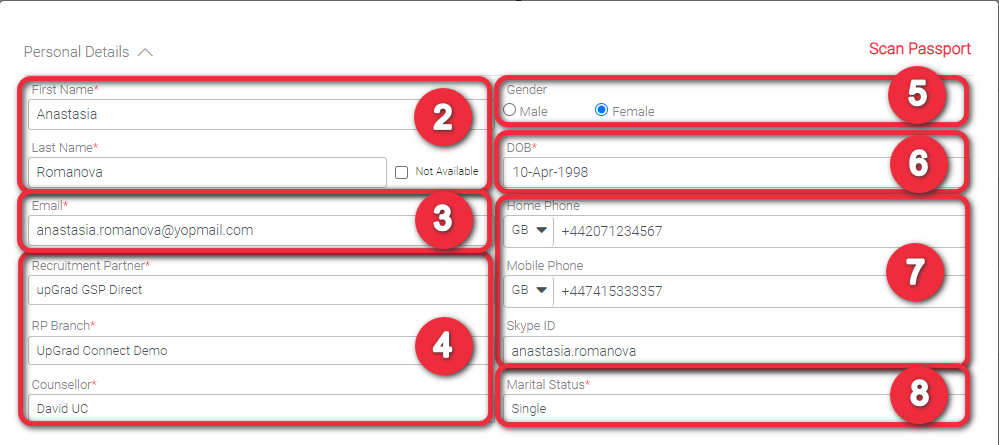
Start of Employment – This is the date when the student started working in his/her employer.

End of Employment – This is the last day of employment of the student in the employer you are about to fill out. Leave this blank if the student is currently employed.

Professional Membership – This field has no maximum character input. If student has multiple professional memberships, you can separate each using a comma. You can input the most or internationally recognised, or the most relevant membership to his/her current profession.

Employer – This is the name of the company/ organisation where the student is working/ worked.

Manager – Input here the complete name (First Name and Last Name) of the student’s direct manager as a reference person in case you need to do some background check.

If you are happy with your inputs, click the ‘Submit’ button to add the student record.

2

A pop-up should then be displayed to confirm that the student has been successfully added. This will be removed by itself after 5 seconds. You will be redirected to the newly added student’s record page.

3

Click ‘Cancel’ button if you don’t want to add a student record.

1

Go to the student record page by clicking the student’s profile picture in the list. This also works if you have not uploaded any profile picture yet for that student.

Go to the student record page by clicking the student’s profile picture in the list. At this point, you are in a view page of student record. You cannot edit any as also visualised by the grey background of text fields. Click the edit icon button to make this view editable. All the fields under the following sections can be edited:

  • Student Details
  • Passport Details
  • Work Experience Details
  • Student Address

2

3

Now that the record page is in edit mode, you can change any student detail except for the Student GSP ID. All textfields with white backgrounds are editable.

To save all your updates, click the ‘Update’ button below the page.

4

4.1 A pop-up will display to confirm that the student details has been updated. This will be removed by itself after 5 seconds.

5

Click ‘Cancel’ button below the student details if you do not want to save your changes. After clicking ‘Cancel’ button, the page will again turn into View mode wherein you cannot edit any detail.

1

Update Profile Picture

The profile picture of student should be his face. A clear, front facing picture is a good example. You should only upload up to 5MB size picture. The file should be an image. Any image file type should work, but here is a list of among the most common file types used:

  • jpeg
  • jpg
  • png
  • tiff
  • gif

Go to the student record page by clicking the student’s profile picture in the list.

This circle is where the student’s profile picture will be placed. Click this grey circle to display the upload pop-up.

2

3

Select the student’s profile picture from your computer. Then, drag and drop it in the upload pop-up.

You can easily check if you dragged the correct profile picture because it will be displayed in the upload pop-up. The file name and size of the picture are also displayed.

4

If you dragged and dropped a picture with a valid file type but is a wrong picture, you can remove it by clicking the ‘x’ mark on the top left of the upload pop-up. You can then just repeat step 3 to upload the correct picture.

6

Set as Profile Image button should be enabled if you have uploaded a correct file type. Click this button to upload and display the picture in the grey circle.

6.1 The grey circle should now be replaced with the picture you uploaded. Click the profile picture if you want to change it.

Click ‘Cancel’ button if you do not want to upload the profile picture

7

1

Change Profile Picture

To change student’s profile picture, click the current profile picture. An upload pop-up will be displayed, which has the current profile picture and an area where you should drag and drop the new one.

Both pictures should now be displayed in the upload pop-up. Click ‘Set as Profile Image’ button if you want to continue changing the profile picture.

2

3

Click ‘Cancel’ button if you do not want to change the profile picture.

The profile image is now updated. This will reflect across all records and list where it appears.

4

1

Add Contact

At the right side of the Student Record Page, there is a tab named ‘Contact’. This is where you can record all the people that you can contact in case the student encountered any emergency situation or for any reason. This info is very helpful especially when in a situation that the student might be unconscious probably because of an accident or health concerns.

Click ‘+’ button under the ‘Contact’ tab to add a contact number of people related to the student.

A pop-up form should appear for you to fill out. Fields that you see with red asterisk (*) are required fields.

Type – this the type of the record you will input. Click this field to show a picklist. Click the most appropriate record type:

  • Emergency
  • Parent
  • Employment

Relationship – this is a picklist which depends on what you selected in Type field. Below is a guide on which Type a Relationship will appear:

If you selected Emergency

  • Father
  • Mother
  • Brother
  • Sister
  • Uncle
  • Auntie
  • Cousin
  • Friend
  • Son
  • Daughter

If you selected Parent

  • Father
  • Mother

If you selected Employment

  • Line Manager
  • Business Owner

2

3

First Name – This is also sometimes called ‘Given Name’ of the contact person. You can type any text in this textfield and it has no maximum character input. You should also put the name extension, if any, like Jr. or III (e.g., Raymond Morgan, Jr.)

Last Name – This is also sometimes called ‘Family Name’ or ‘Surname’ of the contact person. You can type any text in this textfield and it has no maximum character input.

Both fields are required, so the user would know who to find in case he/she needs to contact this person.

It is very important to fill out these with all the location codes so you can easily contact the person in case he/she is in a different country. At least one of the ways to contact should be filled out or else this section will be of no use.

Phone – Sometimes this is called Landline Number. Its format should be the country code + area code + subscriber number

Mobile – This should be the same format as the Phone, that is country code + area code + subscriber number.

Email – This is the email address of the contact person. You should put here the most active email to make sure that the recipient will notice your email. You should only input email address with valid format. Valid formats need to have a prefix before the @ sign and the domain after the @ sign. e.g., anastasia.romanova@gmail.com.

4

5

Click ‘Create’ button to proceed on creating this record.

5.1 A pop shall appear to confirm that the creation of the contact record was a success.

5.2 A new contact card shall be displayed under the Contact Tab where you can find all the details you input. The number of cards displayed determines the number of contacts.

Click ‘Cancel’ button if you do not want to create the contact record.

6

Edit Contact

1

Click anywhere in the contact card.

At this point, you cannot edit the fields as the page is in view mode only. Click the Edit button to change the details.

2

3

The pop-up is now in edit mode. Only fields with white background are editable. When you edit a contact detail please make sure that at least one of the following details are filled out:

Email
Phone
Mobile

All fields under System Information are not editable. This is automatically updated by GSP App.

Created By – The user who created the contact record
Create On – The date and time (viewer’s/ your local time) when the contact record was created
Last Modified By – The last person who modified the details in the contact record
Last Modified On – The date and time (viewer’s/ your local time) when the record was last updated/ modified
Active – This tickbox is checked to identify that the contact record is active. This tickbox is unchecked if the contact record is not active anymore

If the ‘Last Modified By’ and ‘Last Modified On’ fields are not filled out, it simply means that the contact record has not been updated.

4

5

Click ‘Update’ button to save all the changes you have made.

5.1 A pop shall appear to confirm that the update of the contact record was a success.

5.2 Updates in the contact will reflect in the card immediately.

Click ‘Cancel’ button if you do not want to save your changes.

6

Delete Contact

1

Created contact cannot be completely removed. You can only deactivate a contact. The details will always be visible but will have a strikethrough so to say the contact is no longer active or valid.

Click anywhere in the contact card.

Click the Delete button if you want to delete this contact record.

2

3

Click ‘Deactivate’ button to confirm that you want to deactivate the contact record.

3.1 A pop-up should be displayed to confirm that the contact record has been successfully deleted. This will be removed by itself after 5 seconds.

Click ‘Cancel’ button if you do not want to delete the contact record anymore.

4

1


There are 2 types of views available when you want to see the list of students under your Company or Agency:

  • Report View
  • Detail View


Report View – There are functions in this view that are not found in the Detail View. Report View is just a simple list of students with their details in a columnar format. Change the view just by clicking the toggle button.

Detail View – this view displays the most helpful student details. By default, this is your landing view when navigating to ‘My Students’ page. Learn more about Detail View

1

This function acts like a Keyword Search wherein it searches the list but on a columnar basis. It also acts like an Advanced Search because you can search fields simultaneously. This function can be found together with the other function icons at the top left of the student list. Click this funnel icon button to search by field.

After clicking the Filter Columns icon button, textboxes below the field columns will be displayed, some of which are disabled by being greyed out. These are disabled because they are the fields that are already found in the Advanced Search. Having them in two functions may cause confusion to users on the search results, so it’s better to disable these fields here.

2

3

The simultaneous search is helpful especially when you want to refine searches. Let’s say you want see all British students from United Kingdom. Type the country under the Nationality textbox. The list will be automatically filtered after typing a keyword.

You can further refine the search results by typing keyword in any of the enabled fields. For instance you want to see all British students from United Kingdom wherein the Counsellor is Fiona Wager. Just type the Counsellor name below the Counsellor textbox while the Nationality is filled out.

4

5

Click the filter again if you don’t need it anymore. The textboxes below the fields will then be removed and the list will be back to its default state (showing all).

By default, the displayed columns are the following:

GSP ID
Full Name
DOB (Date of Birth)
Nationality

Permanent Country
Agency
Counsellor
Agency BDM (Business Development Manager)

Enrolment
Course Application
Case
Document
Notes
Active/ Inactive

However, if you want to see more details in this view you can do so by clicking the Show/ Hide Columns icon button

1

2

When you click the Show/ Hide Columns icon button, a list of available fields with checkboxes is displayed. Checkboxes that are ticked means that they are already displayed in the Report View. Thus, by default the fields itemised in #1 are checked here. You may also hide these as you like.

Check the tickbox of the field that you want to display.


3.1 Upon checking the tickbox, the field will be immediately displayed as a column in the student list.

3

1

The list is by default sorted from the latest created student record to the earliest. Sorting is only one field at a time. If you sort one field, then all the records related to it (the whole row) will follow. And if you try to sort another field, the previous result will be lost.

Click the ‘up and down’ arrow on the left of each field/ column names if you want to sort a specific field.

At your first click, it will sort the column in ascending order (from earliest to latest ). Ascending order is any of the following:

from the earliest date to the latest date
from A to Z
from 0 to 9

The arrow will be changed into an upward arrow and of a blue color.

2

3


Click the upward arrow again to sort the column in descending order (from latest to earliest). Descending order is any of the following:

from the latest date to the earliest date
from Z to A
from 9 to 0

The arrow will be changed into a downward arrow and still a blue color.

1

You can download the student records in case you need to do some reports. You should be able to download exactly how the student list review list is displayed. Let’s say if the data displayed are the following, then these are the only student details should be included in the report:

GSP ID
Full Name

DOB
Nationality

Permanent Country
Agency

Counsellor
BDM

The downloaded report will be in csv format. This format is a spreadsheet where you can create your report or copy paste in your preferred spreadsheet (e.g., Google Sheets, MS Excel).

You can download specific records by using the search functions, namely:

Advanced Search

Keyword Search

Filter Columns

Click the CSV icon button to download the report. If you did not use any search function, the downloaded report will include all the active student records by default. 

A report will be immediately downloaded upon clicking the CSV report icon. You can either find it below your browser’s window (2) and/ or in any of your folders (2.1).

2

3

Open the file to view the details. The number of student records here should be the same as the number of records in the Report View. The first row is the same as the column name in Report View and the details follow.